I use alloy nipples when I build mountain bike wheels for myself. It’s a real weight savings right where light weight really counts. They’re really the only choice for performance use. But, they break and you fix them. Your wheels are light. Simple.
Over the years, I’ve learned a few tricks…
It’s the details that separate the pros from the novices. Nobody is going to notice the results of what is done here except the person doing it. It produces less failures, something few will ever realize is happening.
One of the main failure modes when using alloy nipples for performance mountain biking is head shearing. There’s a lot of cycling of intense loads that the little aluminum nipple has to survive. In time, the head will shear. Once you start seeing the pattern forming and look at the problem, it is clear. The problem is formed at the assembly of the wheel. Most often, a nipple is seated into a hole that has been drilled into the rim. Simple enough. When this sharp edge has been anodized, it’s sharp and strong. Over time, this edge saws into the nipple while focusing all the load into one small area. Not cool. Eventually the head will snap off.
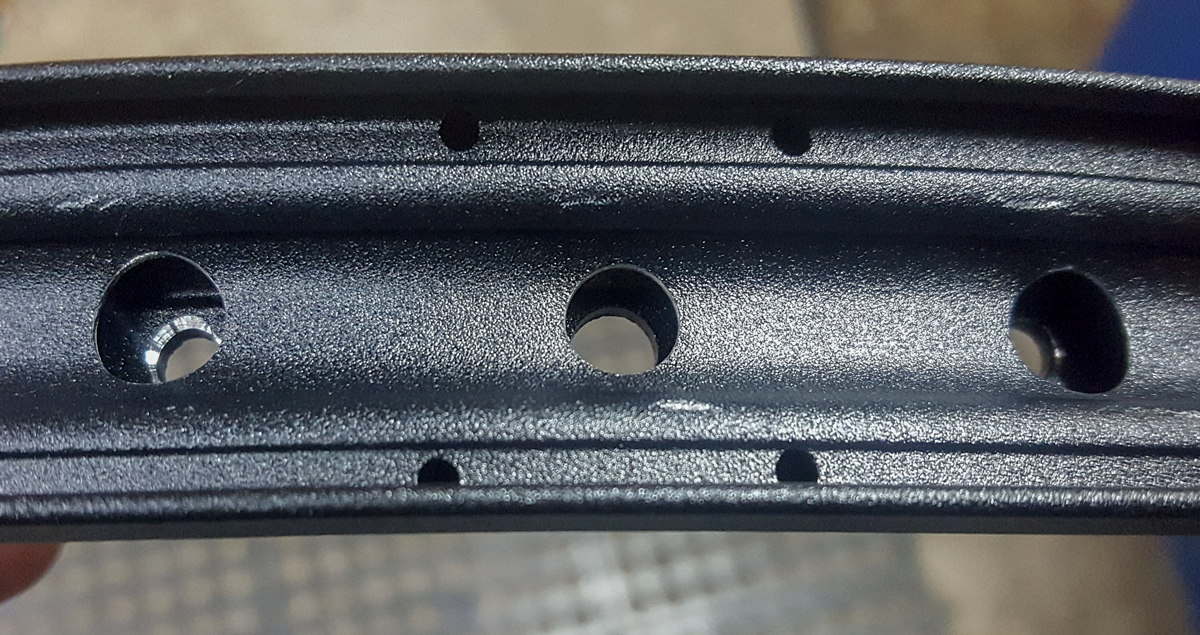
Most rims these days don’t use an eyelet that would soften this edge. So I cut metal.
What I started doing about 8 or 10 years ago is using a 118-degree drill bit to soften this edge. I used the end of the drill as it would reach past the 8.5mm outer rim hole to get to the nipple seat at the right diameter…and I had them laying around. Most common chamfer bits won’t be able to clear the outer hole.
On wheels that I’ve done this on my nipple failures have gone down considerably. It has really made a difference.
After some discussion on the Facebooks today, I decided to look at this in real detail.
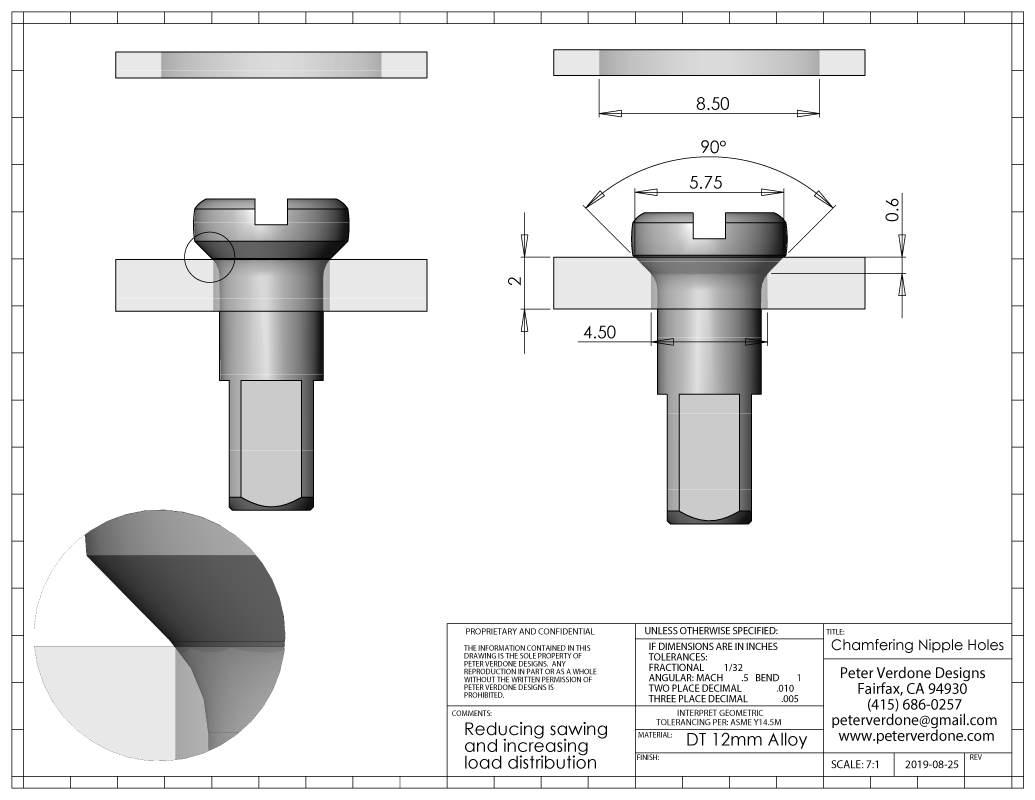
The cut needed in the seat is at 5.75mm diameter at 90 degrees. This matches the face of the nipple best and gives the most support without attacking it. This is nice to know.
The tool to use is most probably a 1/4″ spotting drill or 5/16″ spotting drill with a 90-degree point. Pretty affordable for a cheap bit on Amazon. There are other tools that may work well but it won’t be a common chamfering bit. Any of them will be a lot nicer than the drill bits I have been using. A longer OAL is good as it helps you see into the cut for what you are doing. You don’t want to take off any more material than needed. Err on the side of less cut rather than more. I’ve found that the 1/4″ tool is probably the best for use on most rims.

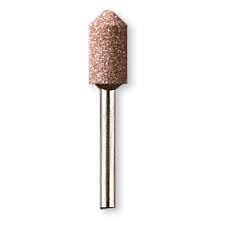
Sam Whittingham suggested for carbon rims that a stone chamfer be used. I found a Dremel 954 Aluminum Oxide Grinding Stone that seems to be perfect for the job. Someone let me know.
On some carbon fiber rims, I’ve used M4x8x0.5mm brass washer to help support the area around the nipple and not damage the carbon. This is very easy and works.
I figure that this rim preparation step is also responsible for wheels that hold their shape better. As the seat area isn’t going to change much when it has the chamfer compared to the sharp edge. With post build cycling and pounding, the chamfered rim should stay straighter.
There is speculation that this bit of prep helps make the rim stronger by not letting the nipple initiate cracking as it deforms the right angle edge. I’ve never been one to fail nipple holes so I can’t speak to this. Maybe someone else can shed some light on it.
A reader found this bit on page 63 of The Art of Wheelbuiliding by Gerd Schraner:
“Nipple holes smaller than 4.3 mm on non-ferruled rims are drilled out, in order to ensure while truing that the nipples can turn easier when they are centered and in order to keep them in line with the spokes. if the nipple holes in this type of rim were not de-burred in the factory, this should be subsequently carried out where the nipple head butts against the rim. If this area is not de-burred, the nipples – especially aluminum ones – can become distorted under high spoke tension..”
Fyi, the 2mm spoke thread is very odd: 2.2mm x 0.45mm Thread (or 2-56 if you like). Maybe folks could get me some quality info on all this.
…and of course, always use blue loctite on the spoke threads!!!!
Part of building better carbon rims is making evil destruction machines. This drop tester in New York measures rim strength and radial compliance, like the 10mm deflection you see here, but it can also measure how well a given rim shape prevents tire pinch flats and other tire damage. There's no such thing as too much testing.https://www.notubes.com/news/cb7-riact/?utm_source=CB7-RiACT-Blogpost-Social&utm_content=CB7-RiACT-Blogpost-Social
Posted by Stans NoTubes on Wednesday, March 28, 2018