
TIRES:
When mounting and balancing tires, here is a little trick.
Most tire manufacturers supply some sort of marking on the tire to show where the lightest part of the tire is. This is usually a red, yellow or white mark.
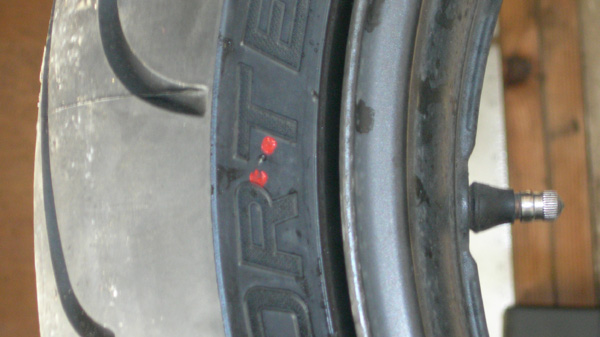
"Some METZELER tires have a red dot in the tire sidewall to indicate the lightest point which should be positioned next to the valve." Metzler
"Dunlop street tires have yellow balance dots in the bead or sidewall area to indicate the lightest point of the tire. All Dunlop street tires should be installed with these balance dots at the valve." Dunlop
DO NOT FOLLOW THIS ADVICE!!
I spent some time and balanced my rear wheel without a tire in place. I found that the heaviest point on the wheel was actually 90 degrees away from the tire valve. That would be the correct point to place the lightest point on the tire. I checked the wheel with the sprocket carrier in place as well, but it made no difference in the balance of the wheel. The red dot on the new metzler shown was very accurate as to the location of the lightest point on the tire.
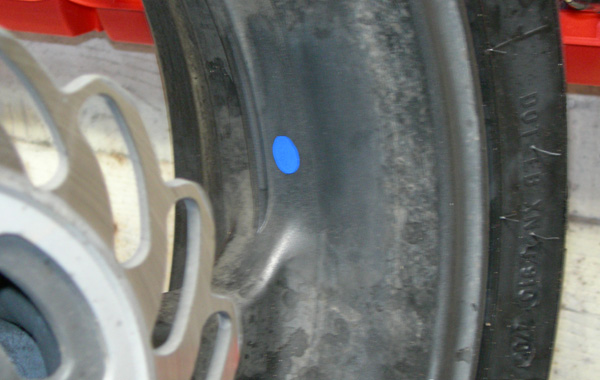
Take some time and find the heaviest part of your wheel and mark it. I used some blue paint pen (my red paint pen was at work). you could also scripe the point with some sort of obvious mark.
This will make the wheel easier to balance and use fewer weights, sometimes, none at all.
This is how they would like you to mount the tire.
This is actually the heaviest part of the rim, 90 degrees away from the valve. The red dot should have been placed with the blue dot.
Here is the math that proves that the way I suggest (method 2) is better than either other way. Method 1 is what the tire manufacturer recomends. Method 3 is interesting. When I first brought this topic up on a message board, a very experienced mechanic that works for Dunlop at AMA and AFM events chimed in. It was his contention that for truely fast riders, like Matt Mladden riding a 200hp bike to it's limits, the rear tire will spin on the rim causing a serious misbalance of the wheel at the speeds that they go. To reduce the magnitude of this misbalance, he said that they will balance the wheel first without the tire, then they mount the tire according to manufactures recomendations, then they balance the wheel again. This made no sence, so I did the math. With regard to tire spin, it makes no difference how the initial balance is done. In light of this, method 2 is superior since the least amount of weight is added to the wheel.
After some time and after giving this subject some considerable attention, I have come up with an improved approch on wheel/tire balancing. What you do is dynamically lateral balance just the wheel, leaving it radially out of balance and mark the heavy spot. The weights used to laterally balace the wheel are marked so that they do not get removed later. Then the tire is mounted in a manner that mates the lightest point on the tire with the heaviest point on the wheel and radially balanced statically in the feild or track. This technique will give the wheel a reasonably good dynamic balance while allowing for static balances in the feild or on the track. Cool!
![]()

Dynamic Wheel Balancers for motorycycles:
Coats, Model 700
Hofmann USA, Model 2300M
Changing and repairing tires:
When you get a flat, one of the few safe ways of repairing the tire is by using an internal mushroom plug. The Patch Rubber Co. makes such a plug. Installing this plug requires partial removal of the tire at a minimum. If you have a roadside emergency and absolutely have to, use an external plug, but replace the tire or plug it properly ASAP.
Here is some good info:
http://mc.bridgestone.co.jp/pdf/mcintroe.pdf
http://home1.gte.net/pjbemail/EdgeLoss.html
http://www.gdconf.com/archives/2000/zuvich.doc
http://www.ctre.iastate.edu/pubs/crossroads/94measurement.pdf
http://www.totalmotorcycle.com/photos/tire-tyre-guide/Tire-TyreTech.htm
PRESSURE GUAGES:
http://www.mcnews.com/mcn/technical/tiregauges1.pdf
http://www.mcnews.com/mcn/technical/tiregauges2.pdf
http://www.mcnews.com/mcn/technical/tiregauges3.pdf
http://www.mcnews.com/mcn/technical/tiregauges4.pdf
This site has not been
updated since Fall 2006.
Since then, all new projects
have been place on my wiki
site.
If you like what you see on
this site, Make sure to go
to the wiki for even better
projects.