This post was inspired by a conversation that I had the other day when I bumped into my friend Cameron Falconer at Java Hut in Fairfax prior to the each of us leaving on a ride. I was on my neat Firefly 29″ bike and he was on his road bike. Somehow the discussion of gearing of 29″ bikes came up as the Firefly is currently set up with a 36/24 & 11-32 cassette. He said that on his SC Tallboy (100mm travel) he was running 38/26 & 11-36. I was aghast. It sounded so wrong. I really couldn’t believe it. My first impressions were that it was way too tall of a gear and that it shouldn’t even work well mechanically. Interestingly, I was wrong on one of those points. Let’s get into it.
Look around at the mountain bikes on your next dirt ride. Look at the chainrings, cassette, chain, and derailleurs. We have a lot of options available to us. You can use endless combinations of parts for your drive train regardless of whether it’s a good choice or not. I think a lot about this kind of stuff because it has a huge effect on how well the bike connects the riders power to the terrain, how well the shifting functions, and the introduction of possible failure of the system. Choices that are made with the drive train can be very good or very bad and for different reasons for different people.
For comparison, I converted the drivetrain charts here to meters of development. Regardless of the differing wheel diameters here, one rotation of the pedals will be resolved into a specific amount of forward motion in meters. Simple enough.
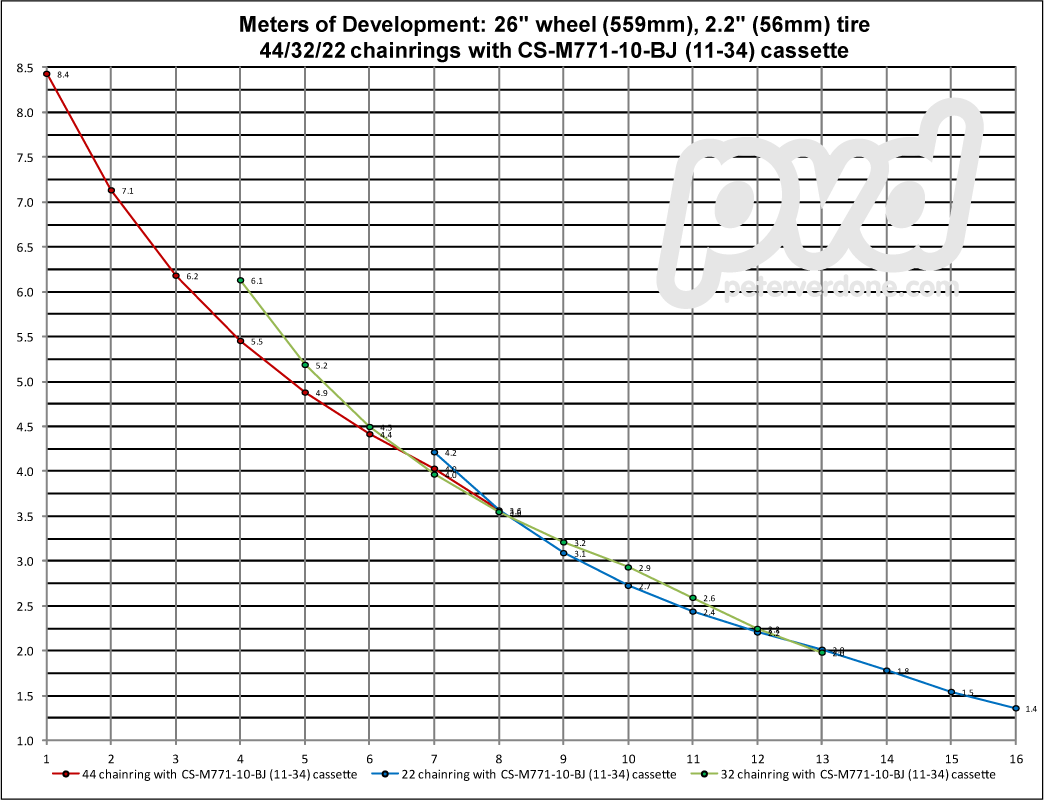
Let’s look at the long time standard drive train that has been run on mountain bikes for the last 10 or 15 years. 44-32-22 chain rings and an 11-34 cassette. This is a 10 speed model, but 9 speed is only slightly changed.
Of the 30 possible gears with this setup, only 16 really exist with some minor deviations. The overlapping transition zones are meant to be where shifting happens or to delay a front derailleur shift pragmatically. The development of this system results in a range from 1.4 meters to 8.4 meters. Any of us with experience running this setup will know that development over 7 meters tends to be used on just the very fastest of fire road descents or on road burns while development beneath 1.5 meters is used for climbing that is so steep it’s usually better to just hike. This is a wonderful setup if you are truly using this range; epic steep climbs and road burns home. Not many people really use this range and things have changed.
Many of us in the mountain bike world have gearing requirements that are a bit more narrow than this. Light, strong racers tend to want a narrower range a little on the tall side while trail riders will want a narrower range on the shallow side. This is an explanation for the rise to the 2×9/2×10 drive trains. For the strongest of racers, a 1×10 setup can be used but more benefits can be extracted with 2×10 by mere mortals.
Let’s take a look at Cameron’s drive train:
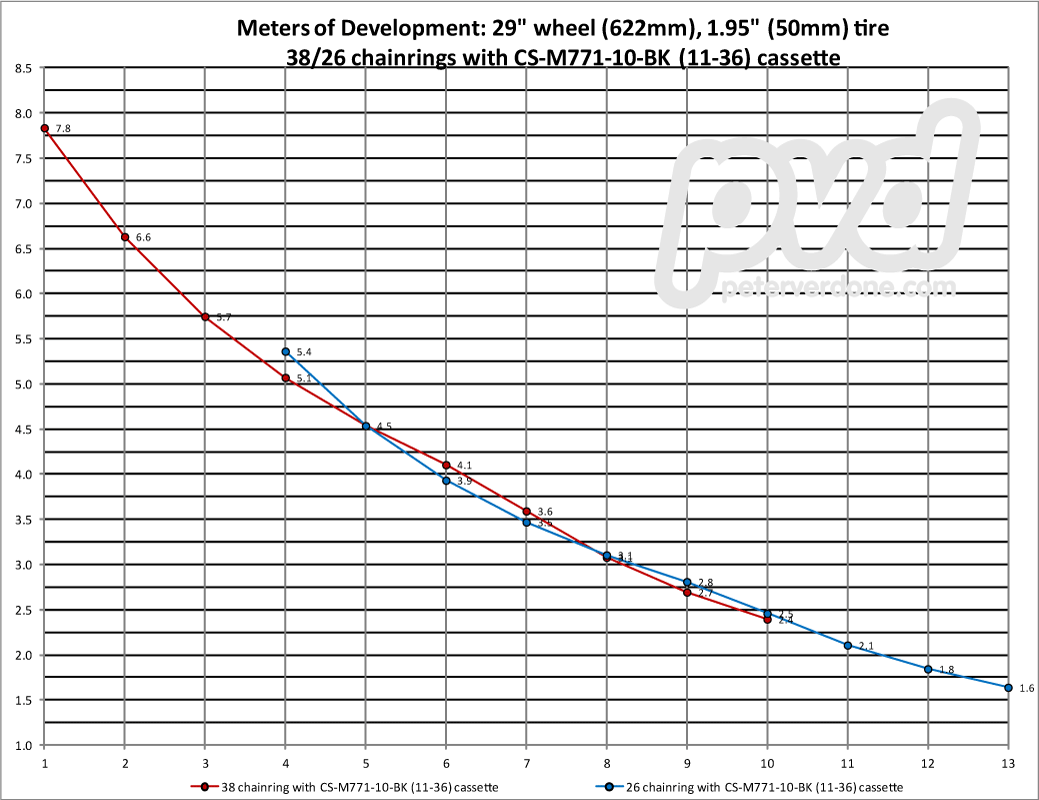
This is actually a pretty nice setup, contrary to my initial feelings. Overall, it’s a little tighter than the old 3×10 standard. The steps between each gear are ever so slightly greater when you see the data to the second decimal place. I’m not the biggest fan of this large of a jump as it’s difficult to find the sweet spot for just the right gear, always a little high or low. I love the smooth transition and close overlap, especially with the 29″ wheels (the 26″/29″ mathematics change things slightly). With the Shadow+ derailleur in place, Cameron loves this setup.
This get’s into the hidden problem (in my opinion) with drive train setup: chain tension. A drive train isn’t just about reduction, to work well a drive train needs proper chain line and decent chain tension (in addition to the derailing system).
Chain line on most off road bikes will be:
50mm (triple)
46.8mm (Shimano 34-38t double)
48.8mm (Shimano 40-44t double)
57mm (downhill)
49.5 (Sram double)
Ensuring proper chain line is important. Special care does need to be taken with some shimming of bottom bracket cups sometimes. This isn’t the biggest deal though as most setups will go together well unless the ‘mechanic’ is a total fool.
The big issue, chain tension, requires a great amount of care. Derailleur cage length and chain length are orchestrated to make sure that the chain has enough tension so when the bike is bouncing around on the trail it keeps itself out of the tire, off the ground, and on the correct rings and cogs. Newer clutch style derailleurs will work to assist this happens, but the system should be setup properly in the first place regardless.
On a hardtail, we ensure that the chain is as short as possible as it crosses from the largest ring to the largest cog with the derailleur in place. This gives us the safety of being able to do a stupid shift when distracted without destroying our bike. We then choose a derailleur length appropriate for taking up the slack to the smaller gears, long, medium or short. On the hardtail and a 12 tooth chain ring difference (my personal max) a 36t cassette will require a long cage derailleur. With a 34 or 32 tooth cassette you can run a mid length derailleur. Shorter derailleurs shift better and have less play.
On suspension bikes we have an additional hurdle. The effective chain stay length typically grows as the suspension is compressed. Thus, the chain has to be able to go big/big throughout the stroke. The results of failing to do this are torn derailleurs, hangers, and broken chains as seen constantly at the bottom of lift serve areas near you. Checking this is done by removing the rear shock during setup. On most longer travel setups, running too wide of a gear range will result in a chain that is actually dangling rather than tensioned in some gears, garbage. Too short of a chain on suspension bikes is one of the top mistakes I see on peoples bike setups. It’ll work fine until that magical moment when you have a 10 mile hike out of the mountains or a ruined trip to Northstar.
My recent experiences working on longer travel suspension bikes like the Santa Cruz Butcher (150mm APP), Nomad (160 VPP), and TRc (125mm VPP) helped form my rule of a maximum cassette size of 32 teeth when combined with a 12 tooth chainring difference on 2x drive trains. This keeps a decent amount of tension on the chain yet allows for no possibility of failure under full compression. A mid-cage derailleur can be used which is nice.
This is my problem with Cameron’s setup as I suspect his chain is actually too short.
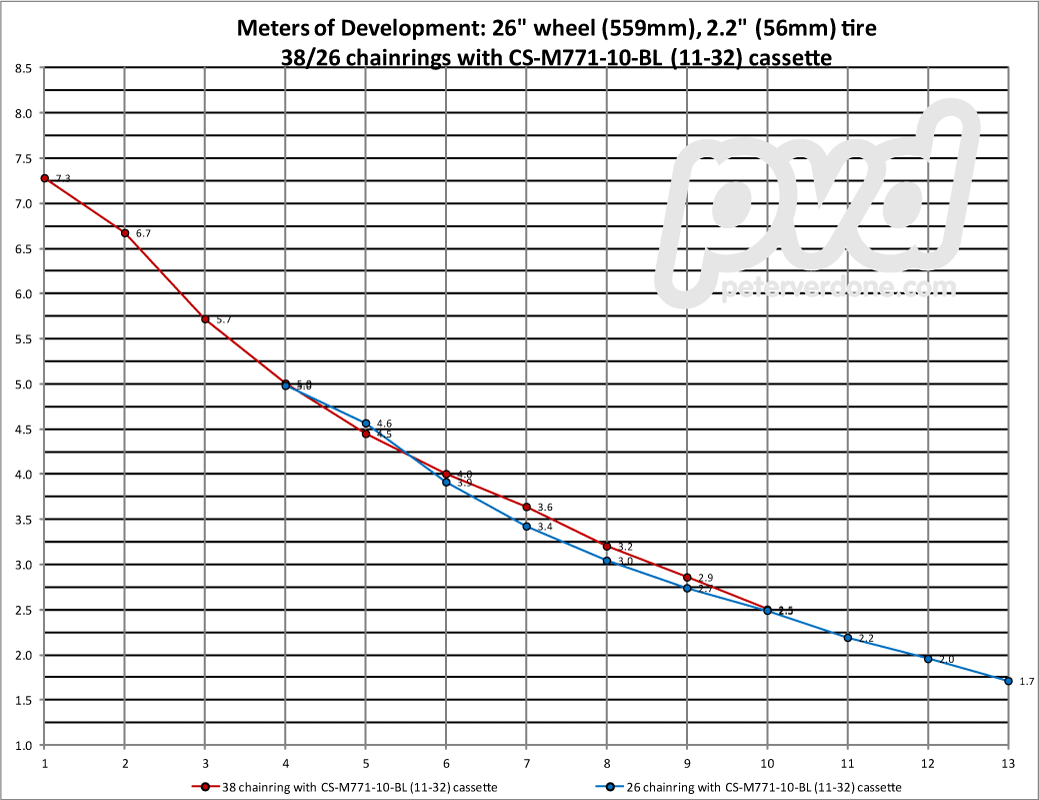
Let’s look at my preferred gearing right now. Given that most of my riding is done in Marin County and out of Fairfax with long fire road climbs and lot’s and lot’s of varying single track climbs, traverses and descents, I’ve ended up with a good gearing on a 26″ wheeled bike of 38/26 chain rings with 11-32 cassette using a GS (mid-cage) derailleur. I’ve been using this on my hardtail and my FS bike. It hurts a little on the climbs, forcing me to get up and huff singlespeed style. It can spin out a little on the faster fire road descents, but as I’m not racing this setup, I’ll survive that. The tight range really feels nice on the trail as the distance between gears is not so great that I’m not out of whack much. The key though is that without a chain guide or clutch derailleur my chain stays glued in place.
Note that the twenty possible combinations of gears ultimately resolve to 13 ‘discrete’ gears with three gears on either end that are dedicated to each of the rings and seven ‘transition’ transition gear where the rider is able to plan shifts for the right moments. It is easy to see that the rider should never really be sweeping the entire range of gears on just one of the chain rings despite marketing claims. Certainly the last three gears should be avoided. This keeps the chain running straighter which is more efficient and causes far less wear than running highly cross chained.
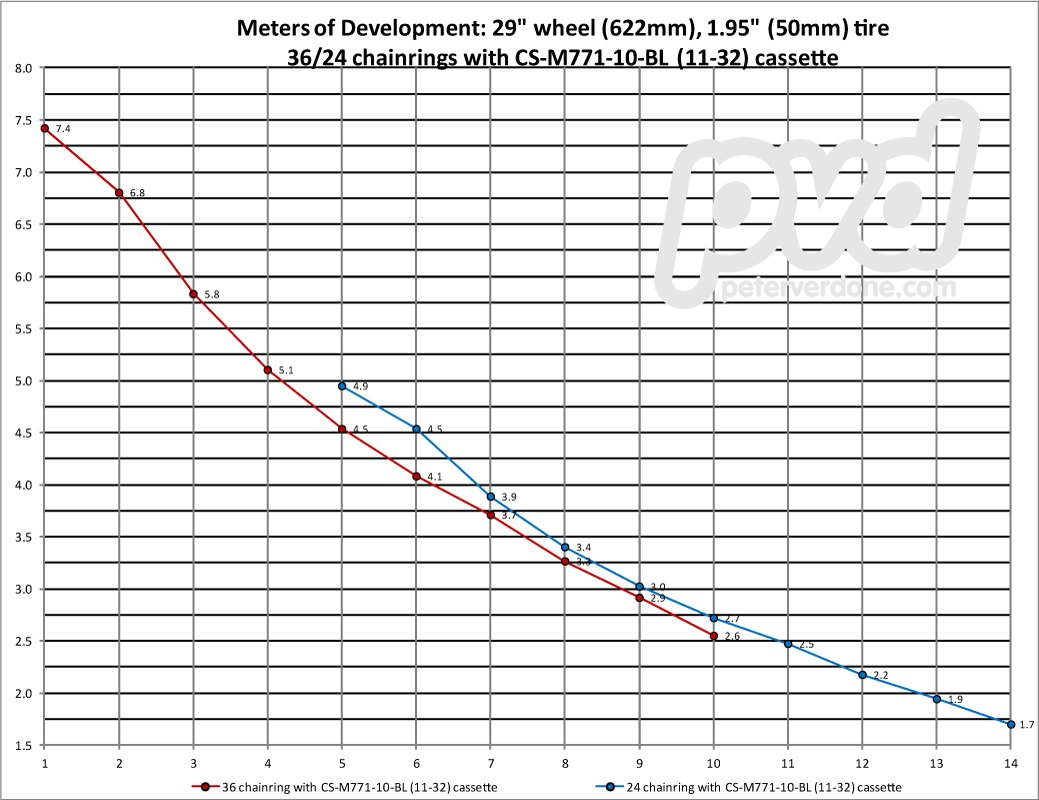
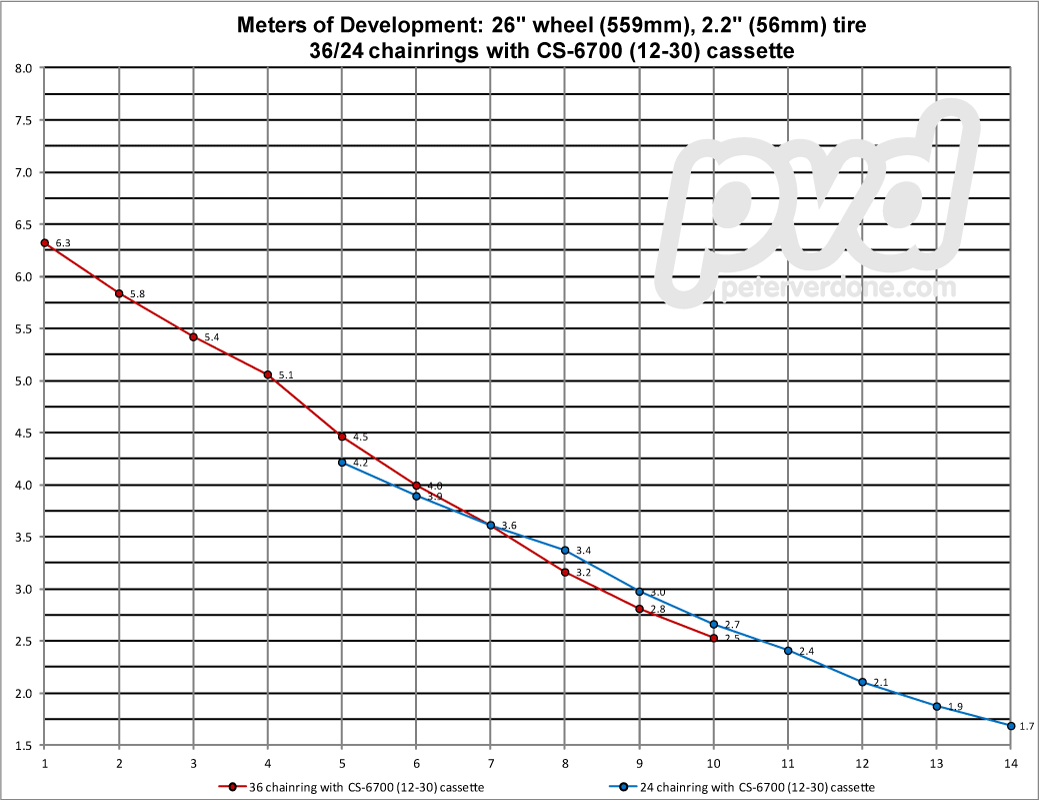
On a 29 inch mountain bike with appropriately sized tires, that gearing can be closely approximated by just bumping the chain rings down to 36/24. Obviously, the essential 13 ‘discrete’ gear choices are available with the same seven gear transfer range between extremes.
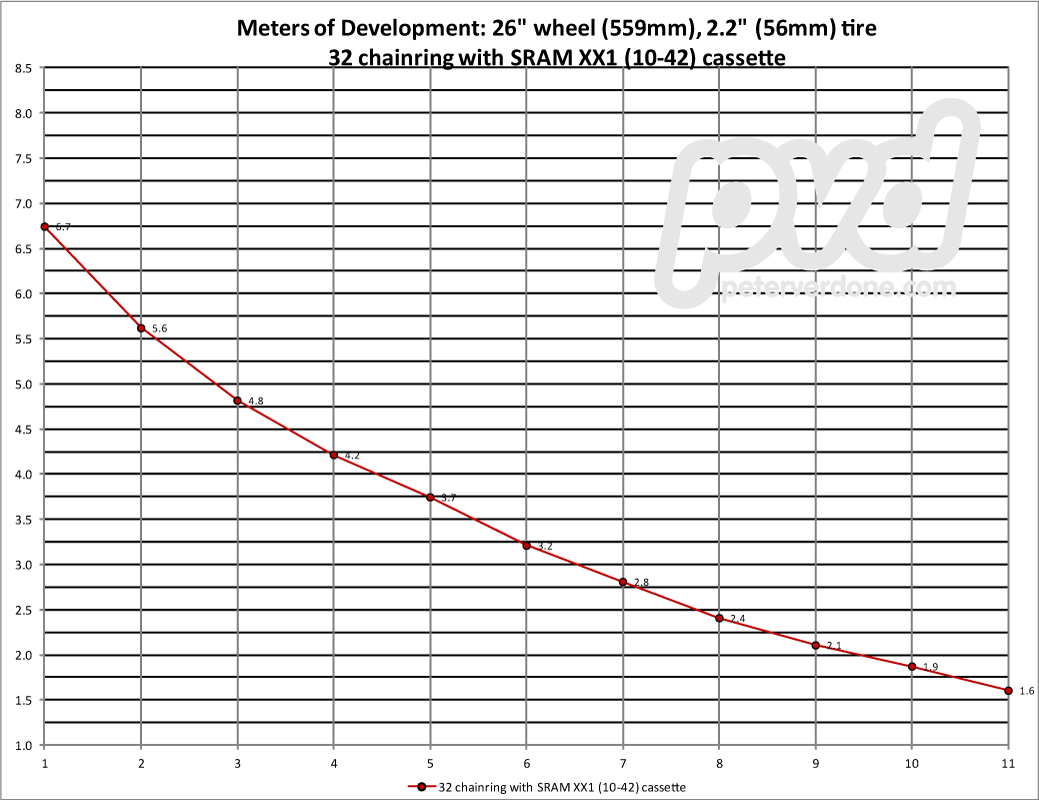
A recent bout of marketing foolishness has resulted in SRAM XX1. I just can’t believe that this piece of trash has happened. An 11 tooth cog is a complete train wreck that we’ve been living with for too long, but stepping that down to a 10 tooth cog is just insane. It’s horrible for your chain, it’s horrible for smooth power transfer, it’s horrible for wheel compatibility. It’s horrible. On the other side, ridiculous pie plate 36 tooth cassettes crept onto the market but (as shown) can have uses, but going to 42 is a joke that isn’t funny. Then there’s the whole 11 speed thing. Ugh. All this to run a single chainring?! Even though 2x works so amazingly well and has a real place in enduro racing. Lastly, focus on the MASSIVE steps between gears assuring that you will always be in the wrong gear. I just don’t understand a racer actually using this even after seeing it done by one pro (Jerome Clementz) in Downieville 2012.
One of the more insane things regarding the marketing behind this gearing configuration is it’s aim at enduro racing. Enduro is a type of mountain bike racing that emphasises bike riding over bike pedaling. Speed and control mixed with some endurance. By definition, this form of racing is done downhill or traversing with a minimum amount of climbing in several stages. Riders get to the top by their own power or by lift or shuttle.
4.1: Structure
All Special Stages must follow a predominantly descending route and focus on testing the rider’s technical skills. Special exceptions can be made for prologue stages.
Enduro racing is about best use of the trails and terrain available. Rider experience and enjoyment should be the focus for any course setter. It is expected that, in order to achieve the best riding on the best trails possible, some climbs will feature within Special Stages.
Liaison Stages
The composition of each Liaison Stage is at the discretion of the organiser. Mechanical uplift (chairlift, truck etc), rider power (pedalling) or a combination of both is acceptable.
EWS RULES.
Given that this is the case, it is important to have the optimum gearing that a larger chainring and tighter cassette can provide with a 2X configuration. Since, the small gear is there for special cases but mainly to get the rider up course with the least amount of fatigue. Dropping a chain is a factor, but as the chain can be run tighter and there are devices for such, I don’t see it being an issue on a properly set up bike.
After seeing how nice the gear distribution worked on Cameron’s drivetrain and doing all the math for these graphs, I stumbled (by going in the opposite direction) on an interesting trail gearing for the 26 inch hardtail bike, 36/24 with a 12-30 tooth cassette with a short cage Shimano Zee derailure (SLX). I’m going to give this a try and see how it goes. It’s going to spin out a little early but should be pretty amazing every where else. Plus, it’s super compact, light, and the function should be ultra crisp.
Ah. The devil is in the details. Stay tuned for the follow up to this post to learn how actually fitting the Zee derailure went down.
**UPDATE**
Riding the 36/24:12/30 drivetrain.
I took the bike out for a couple of rides with this drivetrain after working out the fit issues. It’s pretty amazing. Not really like another setup I’ve used. Heres a quick bullet list of my take for now.
* 6.3 is just in the range for road burning but it has a little of that single speed feel. Once you are going downhill on pavement, you quickly spin out.
* On fire road descending, it’s just enough, pinned on loose slippery dirt. The thing is that I havent tested on a group hammer ride. This gear is certianly not for folks who do a lot of fast (be honest) fire road descending. I’m worried that this will end up being the biggest problem with this setup.
* I think that getting the gear up to 6.75 or 7.00 meters would fix most of the issues on the high end.
* 1.7 is fine for my home area. It forces some work but you are rewarded with nice times. 1.6 meters would factor in some margin of safety. I can live with it where it is though.
* I found that shifting the bike involved lots of ‘double taps’. Quick changes in terrain resulted in lots of clicks. This may be because I was thinking too much about the gear I was in. More time will tell as I learn how to work this system
* Long climbs were great with this as I could very finely tune my cadence for just the right feel. Very nice for a change on a mountain bike.
* With the Zee short cage derailure and Shadow Plus, this drivetrain felt more solid than a single speed. It was just amazing how solid it was, like nothing I’ve had ever. Given the inherent problems with Shadow Plus, the up shifting still felt reasonable. Down shifting magical. Once in gear, it was going NOWHERE! This type of setup will be awesome for kids that like to jump and play on their bikes but still need some range. On a hardtail, no chainguide is needed at all.
I think that this is a great gear for some folks. Most folks do need some change in drivetrain for optimizing anyway. I may end up going back to the 38/26:11-32 after some time riding this. That’s a very proven setup. I may also put some time into making a hybrid cassette that addresses some of the problems.

