This post is about durable solid modeling. Durable models are those that are difficult to break after minor changes when marking-up in the virtual model space. Very often, I see others using methods that produce very fragile and delicate models that explode any time the smallest of change is made. There are methods to prevent or minimize this but they take good teachers and lots of time to arrive at. More people should be talking about model durability.
While I’m not looking to discuss my exact methods, I do want to discuss the cases where we find our models are not as durable as we assumed.
I’m very much a self-taught modeler. There are good things about that and bad. The bad part is that I haven’t been able to learn as quickly from others that have already mastered methods. The good is that I’ve been able to dismiss with methods that are problematic as my real experience is the metric rather that a bid to authority. I also haven’t been working in work groups of any size on models, so I haven’t been constrained by hemiarches for good or bad. Still, most of my greatest challenges have come recently as I learn to work with additive manufacturing on a professional level.
I’ve currently got a few things on the virtual bench. Another draft of the skateboard trucks and a new light gravel/touring bike for my wife. I put a lot of work into the skate trucks at the in the weeks around October and November. They got to a pretty good place but sorting a wheel issue held up the order for prints. That went in last week.
The bike was another story. I’ve digested a lot of learning from the past summer and two mountain bike builds. I had rushed some modeling and made things happen. The base model was a bit of a mess and I needed updating.
- Dropout shape still wasn’t what I wanted. They could be smaller and stronger.
- I needed a dropout that would work with the SRAM COAX system. It’s a terrible thing to design for but a solution exists.
- Dropper post clearance needs to be increased. The 240 posts take up a lot of room and there isn’t a lot of room for more.
- The drop stay worked well on the last bike. I needed to refine the shape. It was pretty crappy but good enough. I want to get more from the design.
- I had separate models for all-road and MTB. Those needed to be combined to build consistency.
The big change would be reducing the number of parts that would swap instead of simply changing configurations. This is important because when a part or assembly isn’t changed from one design to another, upgrades to methods and new details are carried through to all future designs easily, not just the one being worked on. I had done this years ago with the main assembly and it was a boon. Much deeper investments could be made that would pay back in the future. Now I needed to get every one of the parts sorted.
In tying my models together, I decided that there is actually very little different about hardtail mountain bike and all-road bikes. The difference is mainly 6mm in spacing and the structural girth of parts or tubing. Just building that into the models would do the trick, although things get funky around the bb. (hub spacing changes by 6mm while BB spacing changes 3mm)
As I got the designs to a more mature state, I detailed the assemblies and started playing with an idea. I had done all this work to systematize my models more. I should put some time into getting the rear end to work with different wheel diameters. There is a place for 584mm BCD rear wheels for shorter riders. I just hadn’t done much detailed modeling around that size.
Recently, Ronen built that tiny bike, the Dobby, for his girlfriend. 5’2″ tall. That’s a small bike. A 622 BSD is out of place in that space. Ronen and Tim might need a smaller wheel also, they are right at the line given their height.
I’d model around that frame to see what would happen when I pushed my parts as hard as possible with this tiny bike. This is helpful in modeling as durable models will withstand this. Fragile models will explode.
![]()
![]()
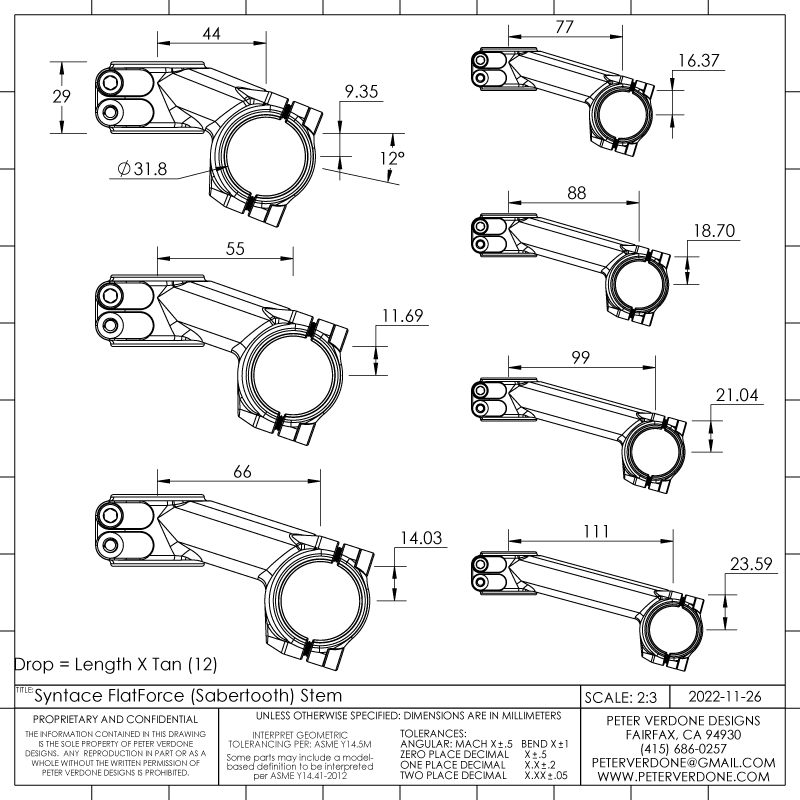
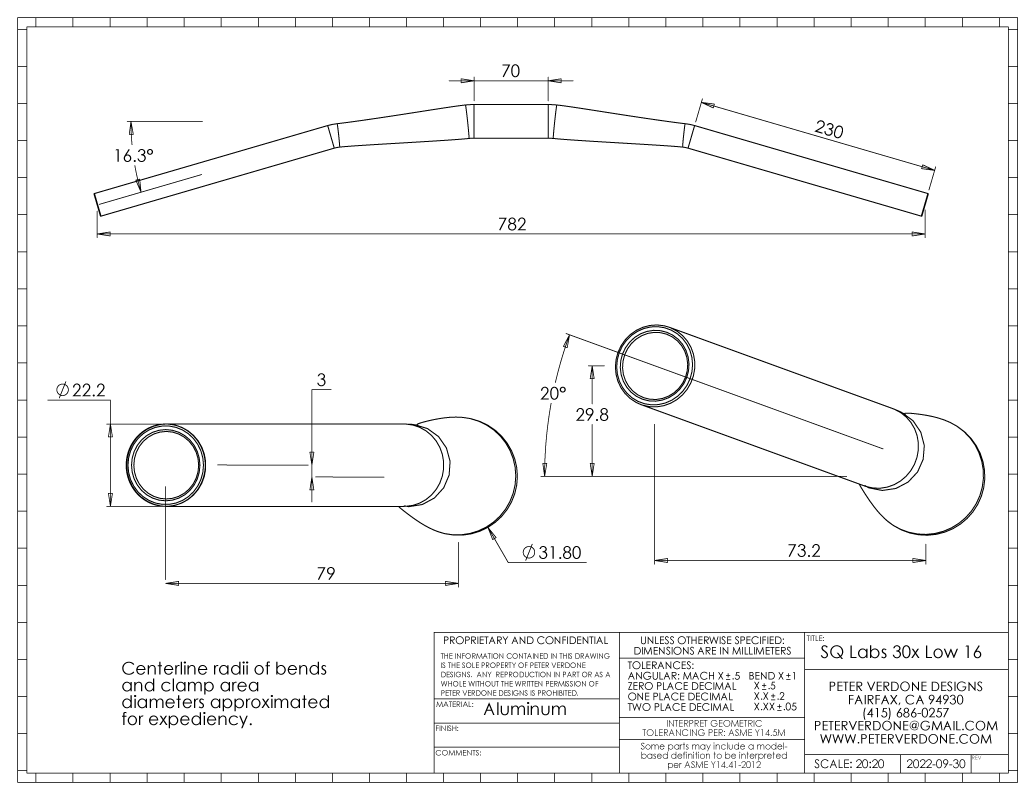
As I mentioned in the previous post, I had to properly model the stem and handlebar for this bike to ensure precise control. Just the process of producing these models forced a new understanding of the geometry of stems and handlebars. The model breading or not making sense drove a method that was repeatable and systematizable. If this can’t be done, you probably don’t have a legitimate fundamental geometry.
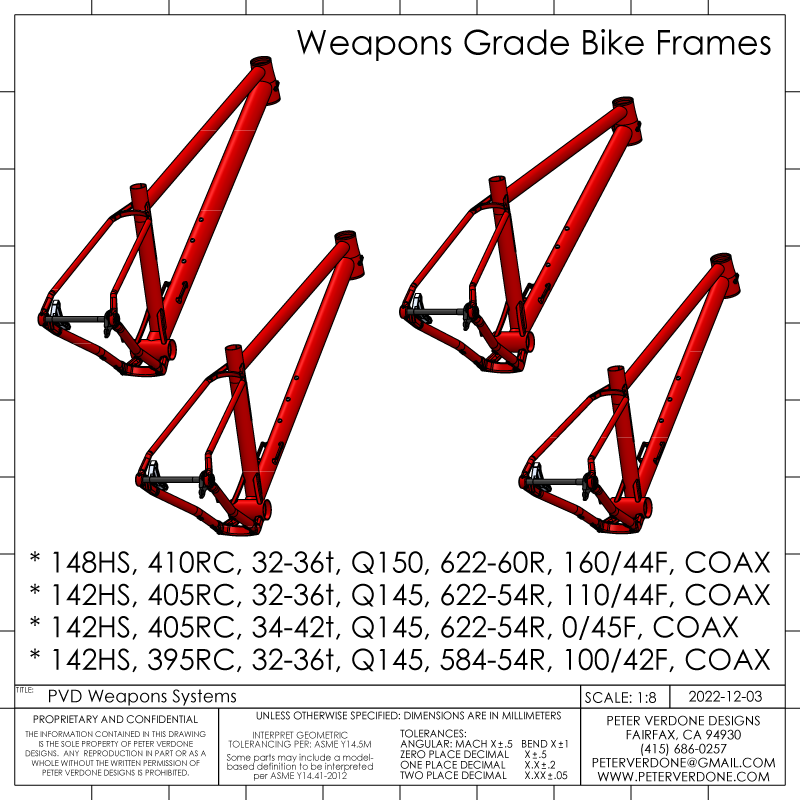
It’s important to push models and assemblies around to see where and how they break. This can inform us on better methods and practices. While the example of the tiny 584BCD frame does push the design to the limits of several parameters, there are a lot of configurations that we care about. In my modeling scheme, there are currently 4 base designs, the full size MTB with a real fork, the narrow-gauge MTB with small fork, the All-road/gravel frame with rigid fork, and the 584BCD. With each of these designs, geometry changes, tube size change, parts change configuration and shape, and some parts swap out for others. It is quite complex under the hood.
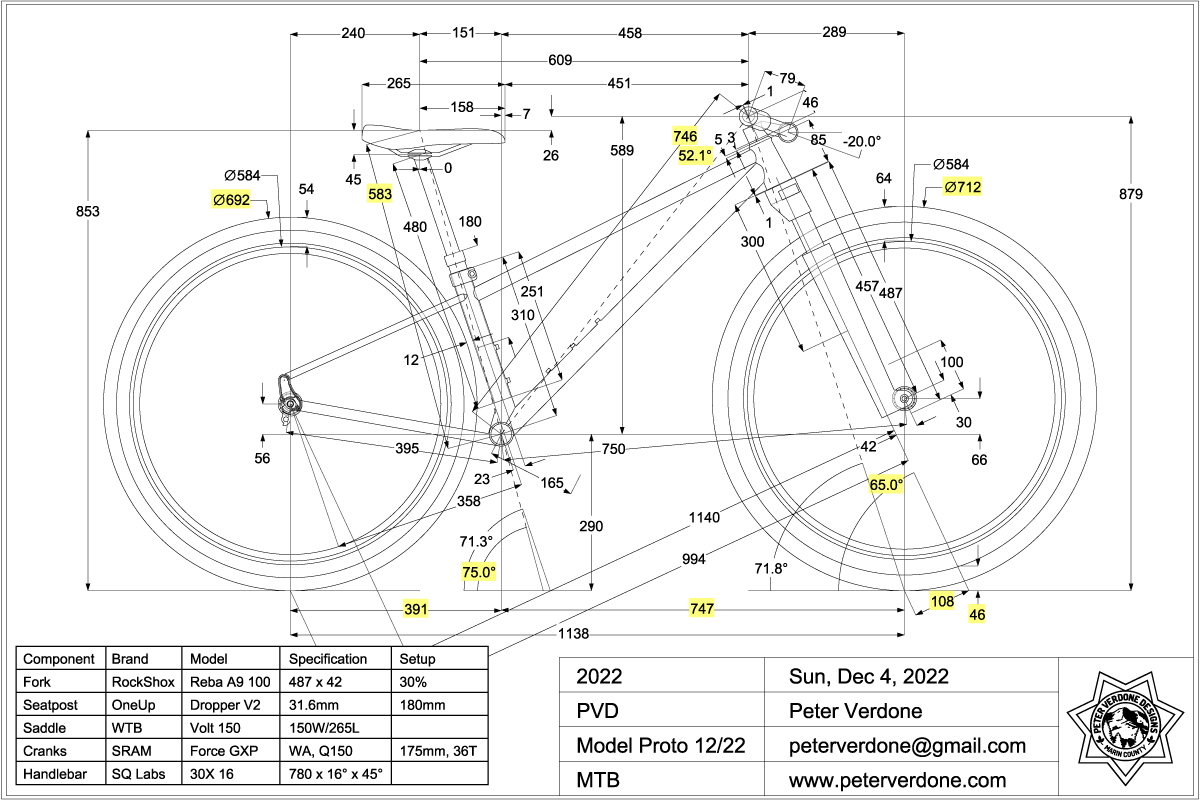
Producing the graphic below is very challenging for a modeler working with SolidWorks (just try). All 4 configurations of the same assembly being shown at once with associated parts having changing configurations. Producing a drawing like this will expose every bit of slop that you’ve built into a model. It will blow up without real care and testing. This is the hard stuff.
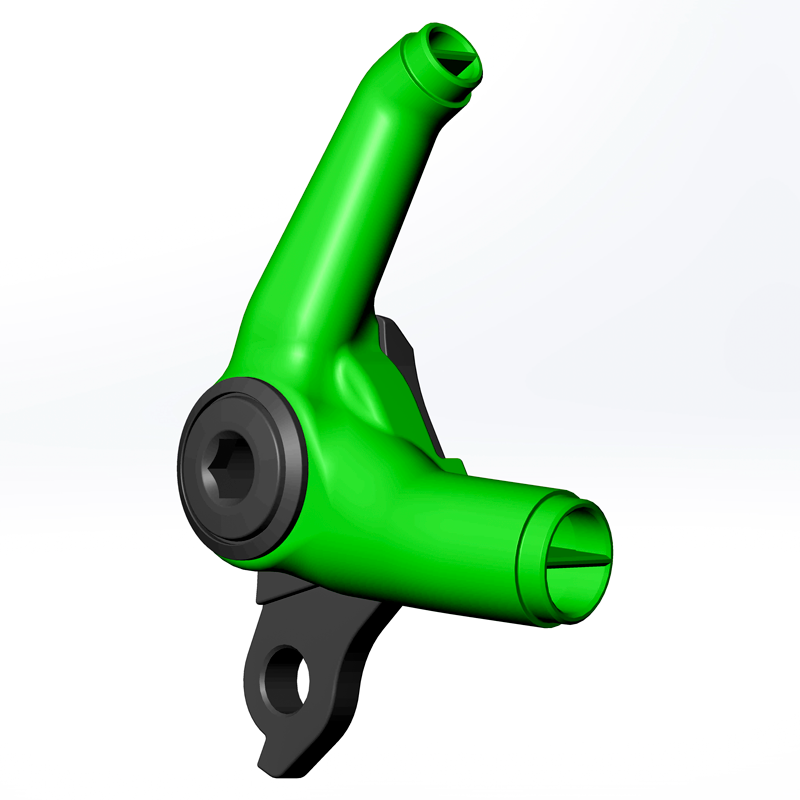
Sometimes the model gets pushed hard in a particular configuration and strange problems come up. In designing my new coax dropout, I was having a problem in a few configurations with a failing feature that was critical in the construction of the model. There was no obvious reason as to what was going on. I put a day or two of time into understanding what was going wrong. Eventually, I found a fillet on the surface that needed to be changed from 10mm to 8mm (highlighted below) and everything would work fine in any case. Crazy stuff happens but it’s nice to find this kind of problem before a detail get’s enshrined into a system.

I’ve been designing bicycles and parts in SolidWorks for the last 24 years. It seems that every time I sit down to really model I learn another way to look at how to accomplish what I do. What has proven to be important is to continually learn and grow, implement improvements on models that grow over years, and solve problems correctly instead of easily.