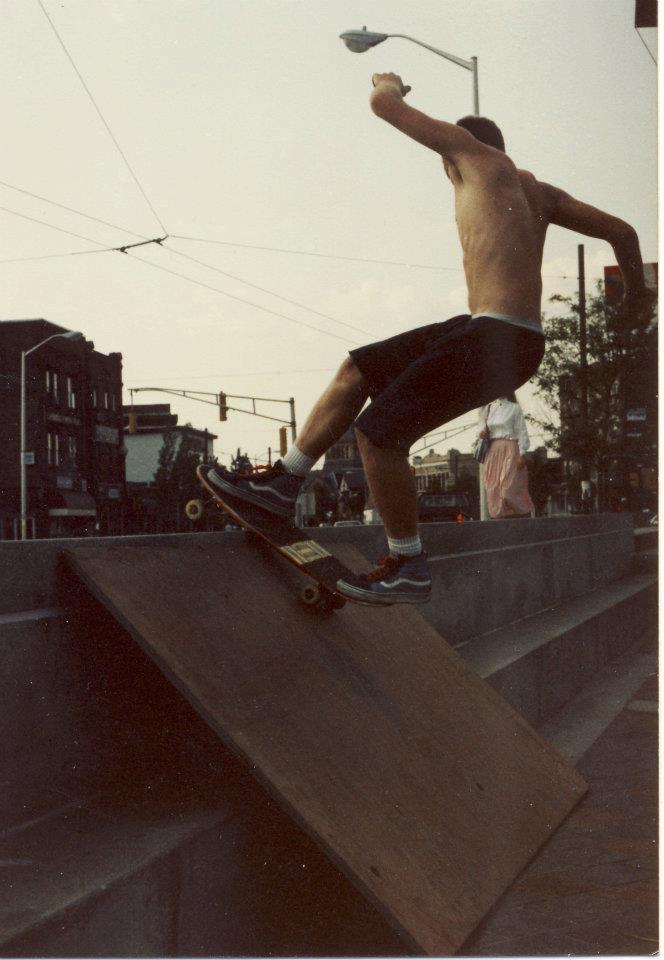
A long time ago, in a galaxy far far away…. (FS rocker shot 1/2 second late. Porter Square, Cambridge MA. 1986)
A child of the 1970s, I grew up playing on cheap plastic skateboards. In the early eighties, the new boom in skateboarding and my young teenage years were a perfect storm setting me on a course that influences me today. I became a skateboarder.
Things were very different back then. If you wanted something cool to ride, you needed to trespass or build your own. Somebody has to pick up the tools and build the world.
At 14 years old (1984) in Lexington, MA, my friend, Mike Mills who was into BMX racing wanted some ramps in his driveway to learn ‘freestyle’. Mike was an excellent bike rider and always impressed me with the wheelies he’d do down the road. ‘Freestyle’ was cutting edge back then. His dad was helping Mike build the ramps and I got to help for some of it. They were handy folk who did a lot of work on sailboats and other projects. We built a 6 foot quarter pipe and a big wedge ramp. While we didn’t do much correctly, The ramps worked and we were able to learn how we could have done it better. I took notes.

I started building my own small ramps soon after that. Everything on my own. The first that I made was a quarter pipe wave style ramp. These seemed like the hot thing back then. You can jump it at different takeoff angles all the way to leaping off the vert corner. It sounds good but it’s a bit useless and really terrible for opening up any progression. It is also probably the hardest type of ramp to construct. I was young and I didn’t know any better. I made it happen…with a 3.5 transition to vert. It was nuts. It was mine. I can’t remember if I drew it before making it but it was a serious learning project to do alone at 14 years old.
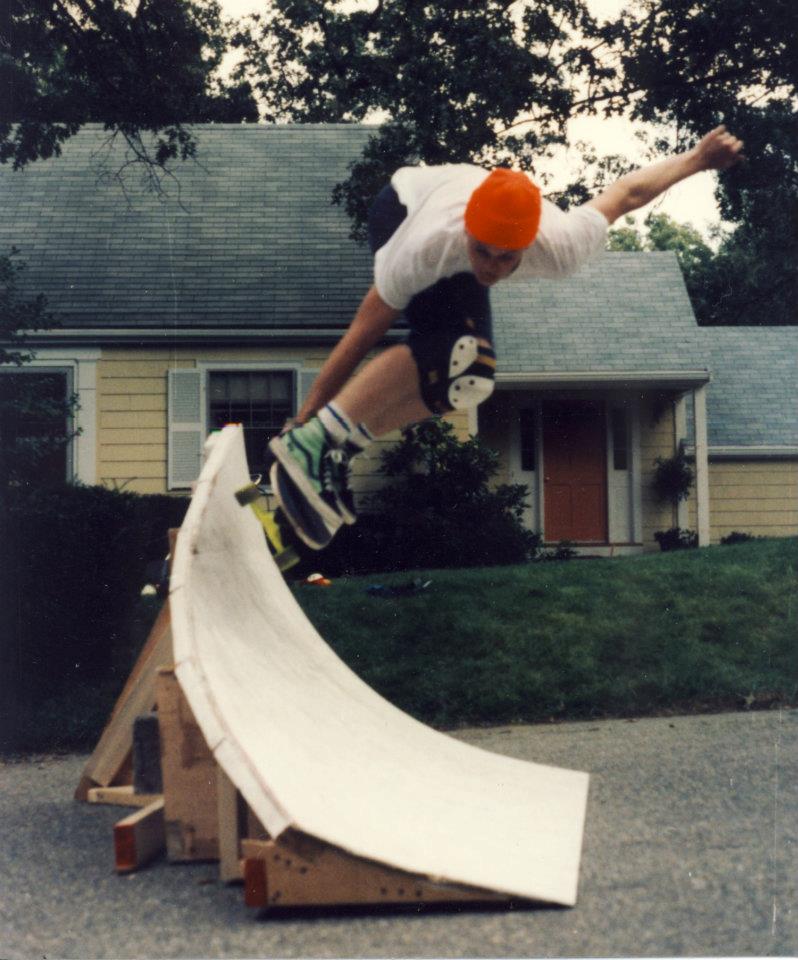
Of course, the network of Boston spots and skaters turned me on to half pipes and others people that were building their own stuff. Once I got a driver’s license, I’d drive to all kinds of strange places after school and weekends to talk my way into a session in someone’s back yard. This meant big road trips, also, to the real big spots and contests. I’d keep an eye out for what worked and what didn’t. Below at some street contest in Jamaica Plain in 1987, not my ramps.
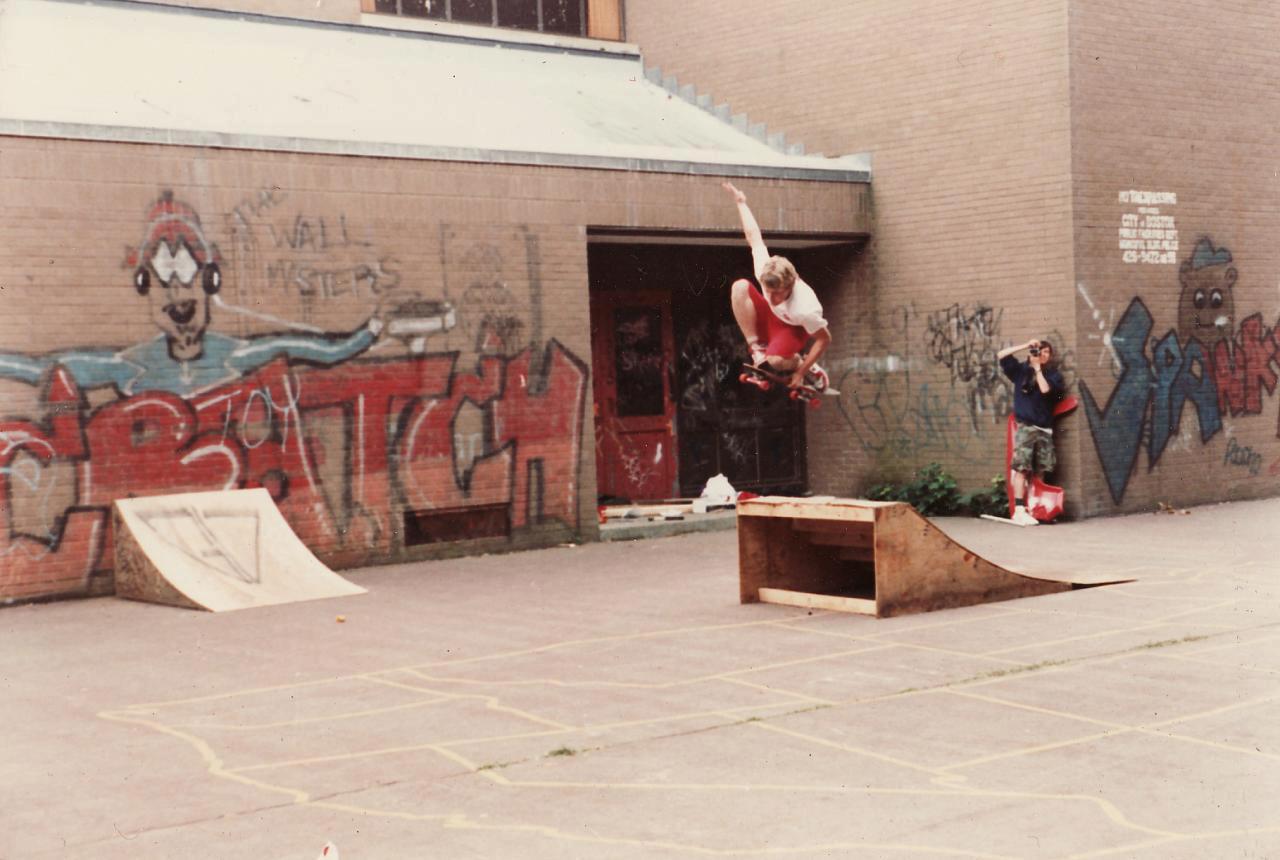
As the eighties progressed and the jump ramp era ensued, I perfected the craft. I’d make a new ramp and we’d drag it around to places to hit it big. Fast runups and perfect walls. You could hit these things at top speed and full power. I had a couple on hand after a while, for gap jumps. I loved that stuff. My ramps were some of the best I’d used.
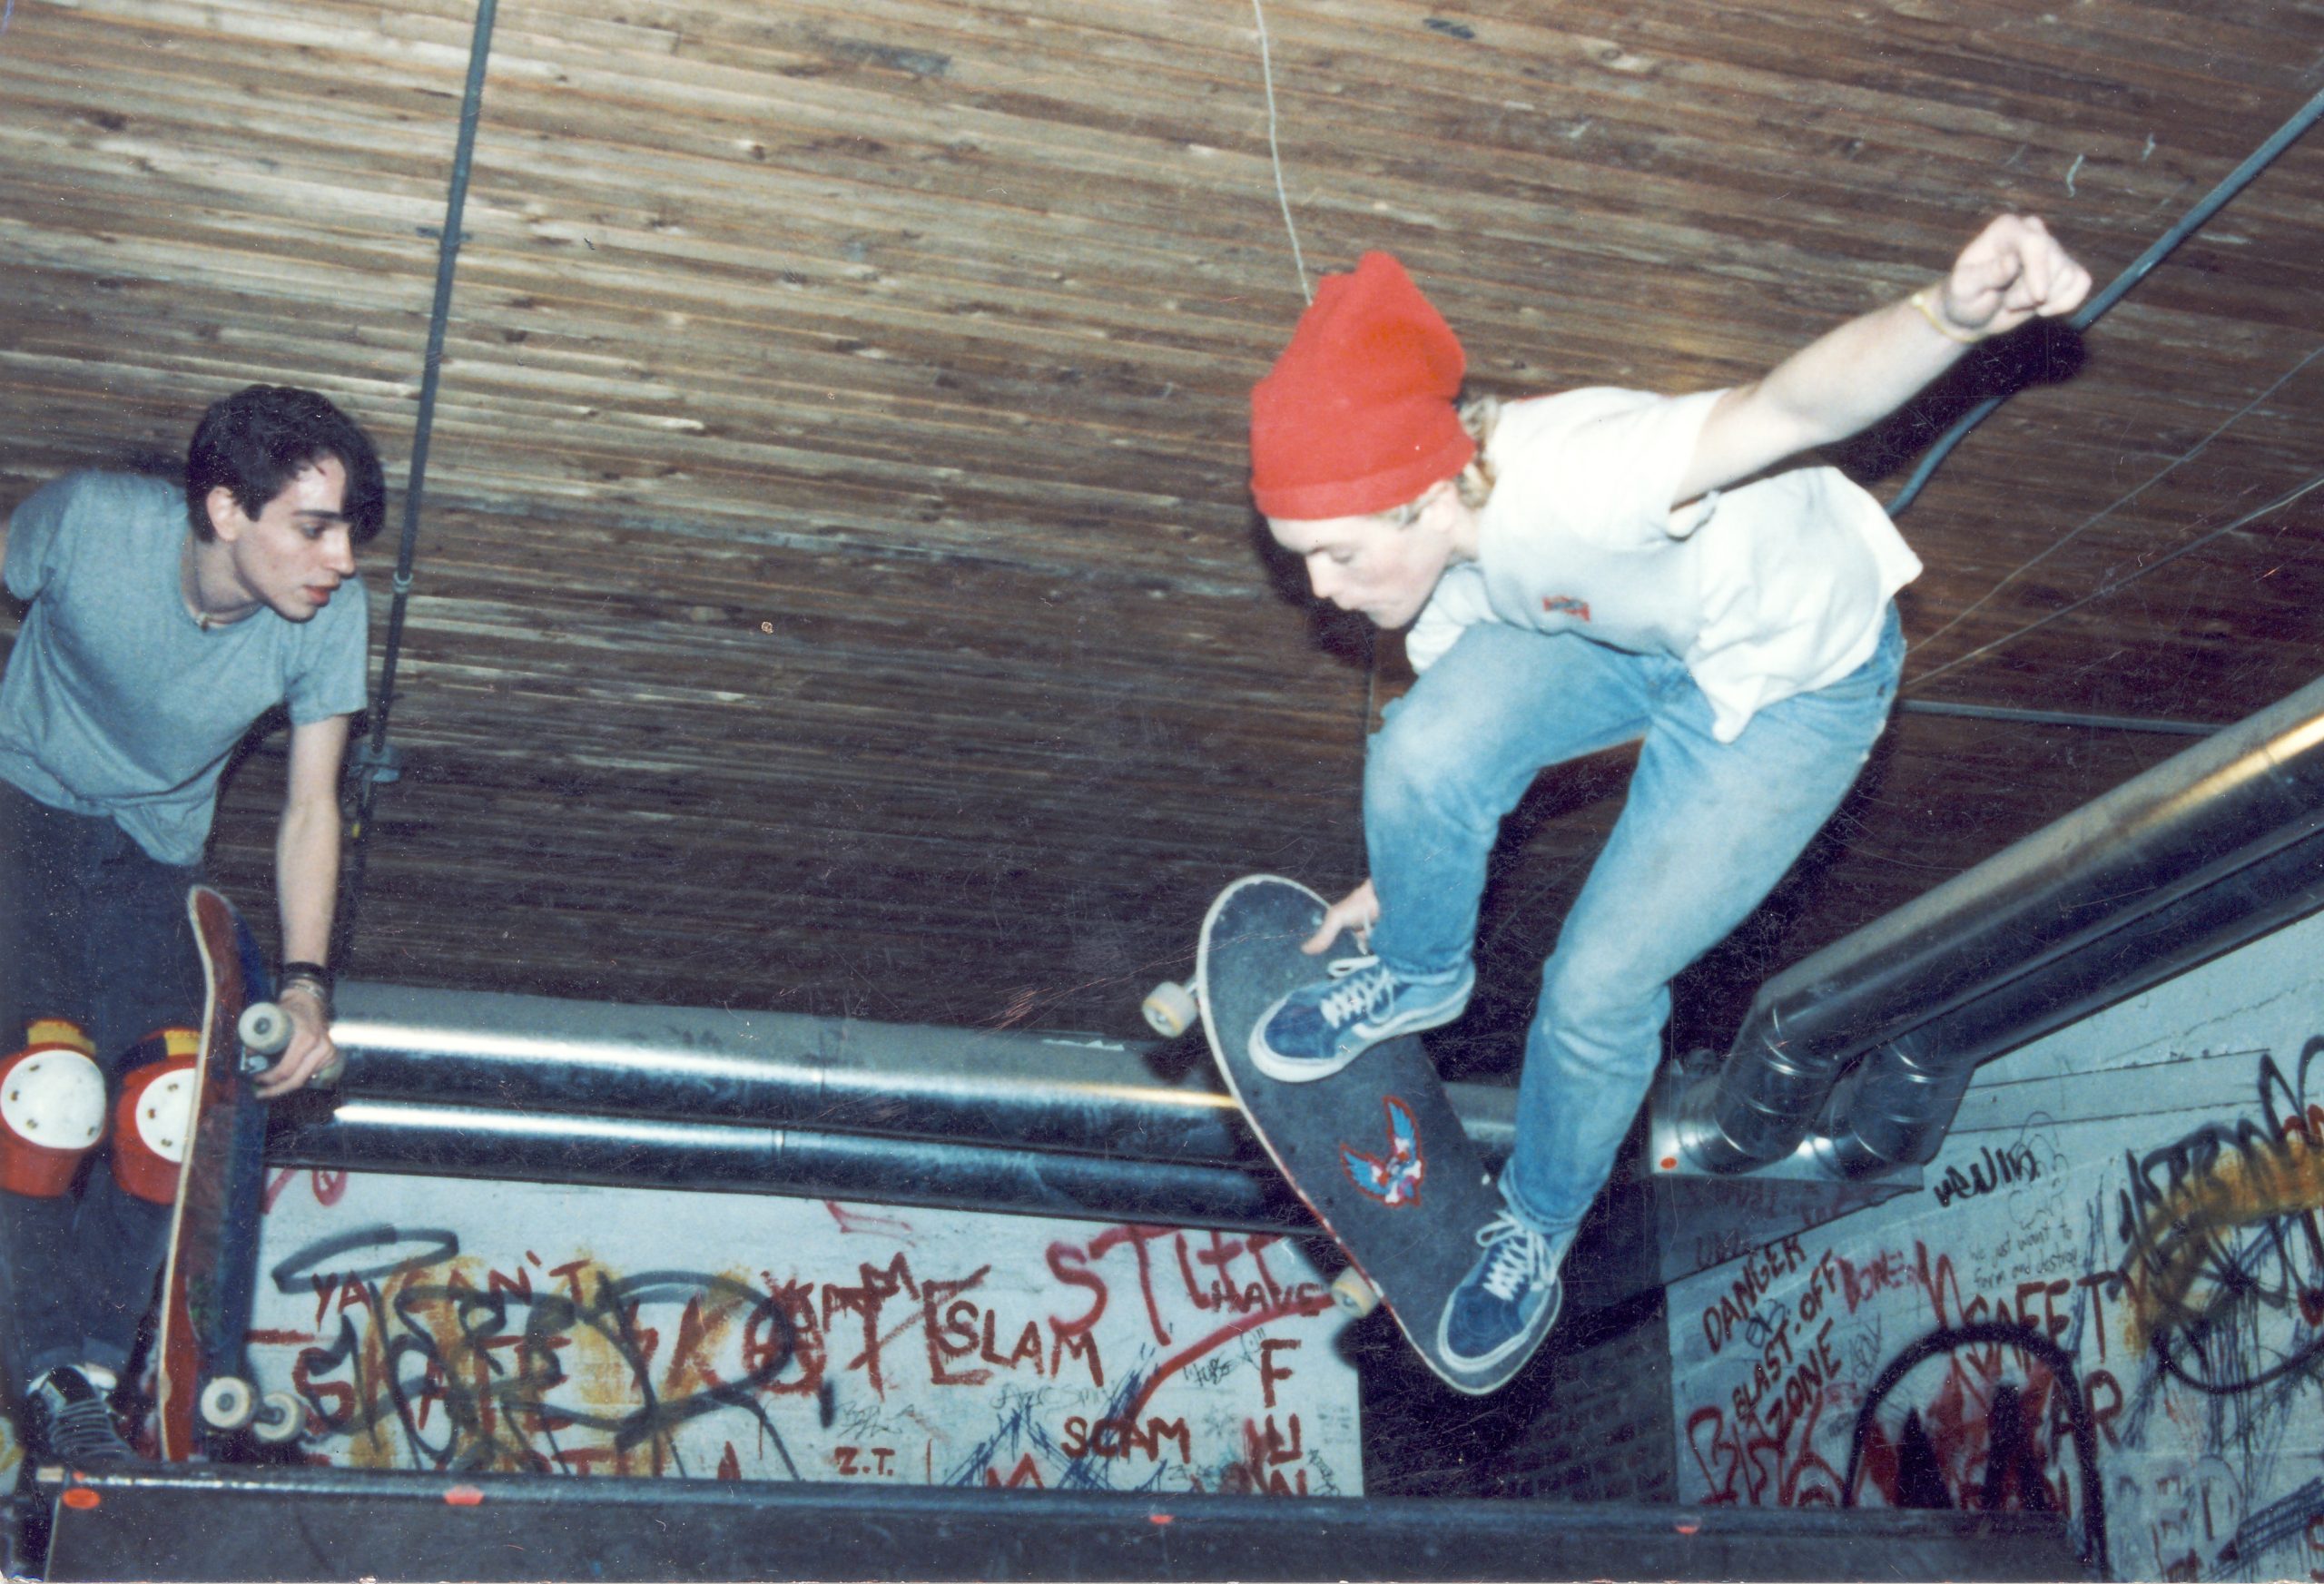
Maximus was discovered in the late eighties. It gave us a basement that initially had two terrible ramps to ride in the winter. It also gave us a hub to meet up and ideas started swirling. Below a tiny backside air on the little elliptical quarter pipe in the Maximus basement in Arlington. Brian is on the deck bent over because of the low ceiling.
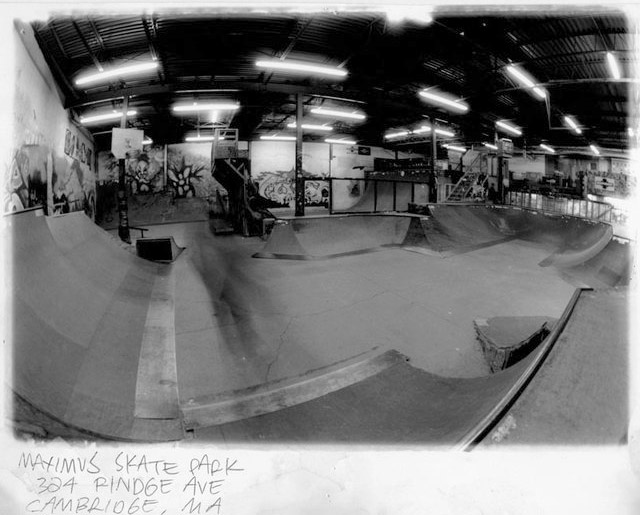
In time, the Maximus Skatepark era began and in time, a bunch of us worked together to build one of the coolest skateparks of that era and in the Northeast. A precursor to the Burnside project and on another coast. How to have a skatepark when nobody wanted you to have one. It was inside a warehouse in the middle of the projects in Cambridge and right across the street from the legendary C-Bowl. We had to pay rent for it..so we charged people to skate. Jeffery and Frank were the leads as they were carpenters and had built a ton of other ramps. I ended up doing the steel coping work for the bowls. I was just one of the crew from time to time. We had a big scene in the Boston area. I didn’t know it at the time but things would never be like this again. The internet and public parks changed things. This was cool stuff and a big part of my teens and early 20s. Below an early photo of Maximus before it was fully built out, 1992?
Recently, a ‘new’ parking lot area has been allotted to the skateboarders where I live in Fairfax and that had me thinking about little ramps. It’s bad enough to have a dinky little pad to flip on. Worse if the ramps suck also. A friend of mine needed a ramp for his 5 year old kid to develop bike jump skills on, and another grom in the area is all about dirt jumping.
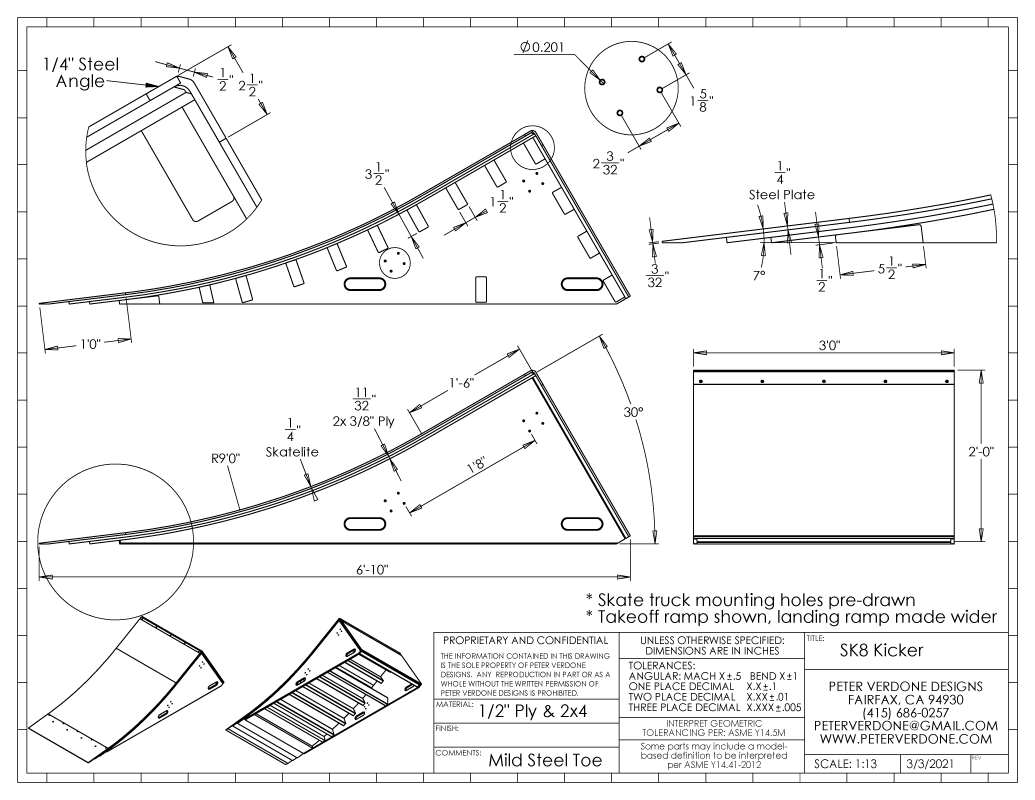
I had ramps coming at me from all directions. It was time to draw this out. This weekend, I documented some of what I learned back in the day and some of what I know now. I drew up a small skate jump ramp and bike ramp. They are quite different. What they do share is the large amount of attention put in at the toe. This is one of the most critical parts of a jump ramp or street ramp. It needs to be made as smooth at possible to disrupt the rider the least as they set up for launch. It also has to be made as sturdy as possible. It is a difficult area to make rugged. This is where most ramps completely fail. There are tricks to doing this.
The skate ramp is a pretty known quantity and something that I have a lot of experience with (as discussed). It has to be super smooth and take a lot of pointed load on the surface without failing. It gets a lot of support beneath the plys. The back side has a little wall to bang against. A nice thick piece of angle at the top makes the edge tough and gives a place to slide and grind. The heavy weight angle is fast and clean when grinding a truck or sliding a board. A nice thing to have on a jump ramp is that is tall enough that the better riders can ‘just’ ollie into it from the back side. This does that. A real boosting ramp will be much taller. It’s a tidy kit.
The design shown here is bias a bit more for flip tricks than going to maximum amplitude. These ramps are used differently in the modern era, nobody is trying to do a method air 10 feet off the ground or big wall rides. Being able to set up for a flip or shifty is important.
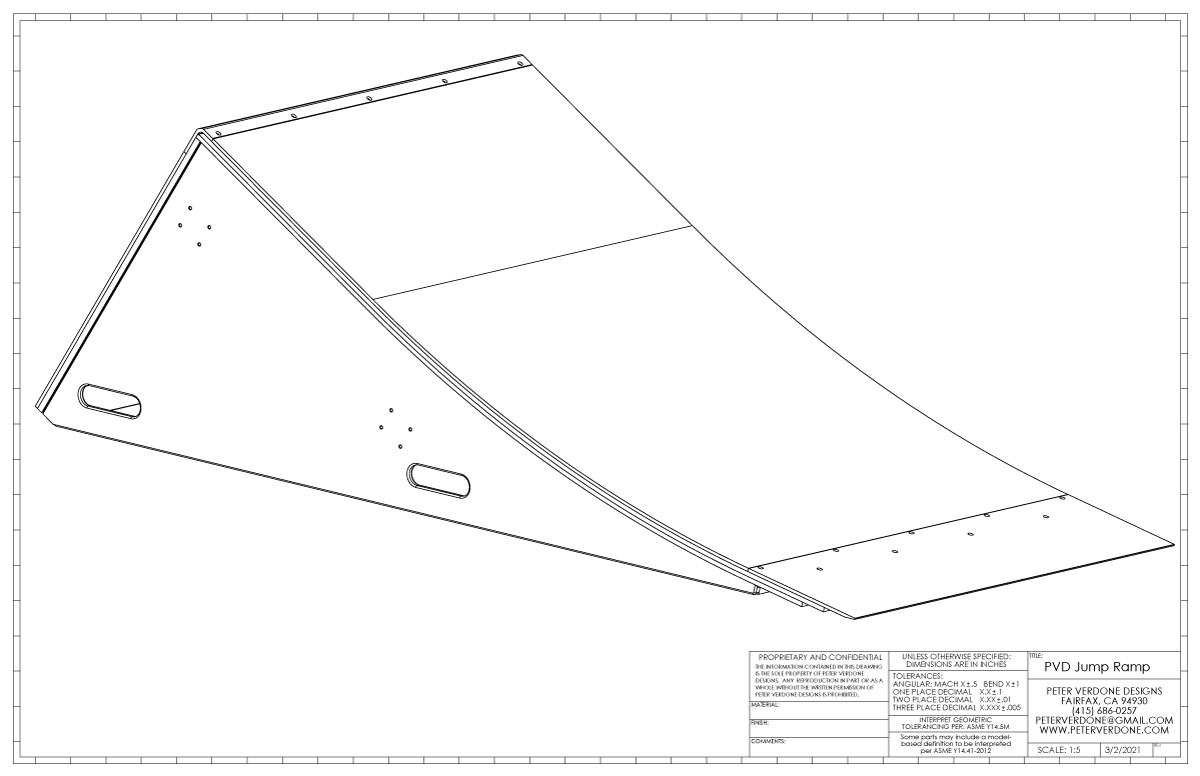
Obviously, handles and drilling for side mounted skate trucks have already been drawn into the part. This makes the ramp easy to pick up and carry or roll around to spots. This is important to plan, before the ramp is built. Covering the back side of the ramp gives some more use and helps quiet down the drum noise. I’m working on ways to let vapor out and also increase stability.
The ramp is 3 feet wide. That’s actually important. It would be a mistake to make a 4 foot wide jump ramp for general use. The reason is simple, the ramp should be able to get tossed into the back of a car for transport. This is huge. If the ramp is never intended to go anywhere then wide is fine but we want to bring a ramp like this to different spots. That’s when everything starts really opening up. Also, we want to be able to have two ramps if we can to do transfers, getting two ramps together is super fun, making them easy to move helps with that. If you know what you can fit in your vehicle, you can modify for that. A Toyota Tacoma pickup truck will fit about 40″ between the wheel wells.
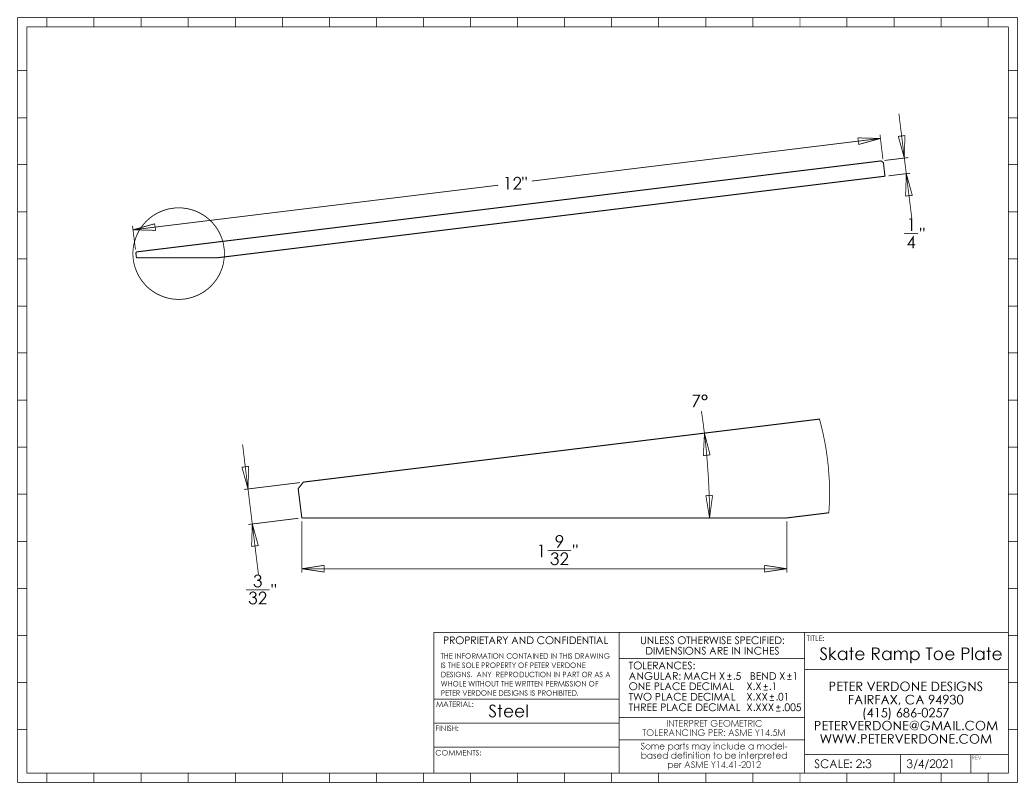
The toe plate on the skate ramp is where the magic happens. A thicker piece of steel can be used when the underside is ground planer to the surface. This is the smoothest way to do this. Using thinner than 3/16 sheet metal and without the underside grinding is a mistake. I see that done a lot. Also, if the plate can be made 12″-18″ the design of the ramp can be adjusted to get the entry angle down, right where the wheels hit the ramp. Notice that the angle on this design I show is 7 degrees with a 12″ plate. With a longer plate, that goes down, 14″ – 5.9 degrees, 16″ – 5.1 degrees, 18″ – 4.5 degrees. All of this is important.
This ramp is drawn at a launch angle of 30 degrees for ease of use. If your goal is max loft and distance, you just change that to 45 degrees. While a full transition ramp will launch a marble at the terminal angle, that would only be true on a wheelbase vehicle if the rear wheels are ridden hard right to the very end, and that’s still assuming a lot. That kind of timing and form isn’t as critical with the straight section as it helps the rider stay true to the real angle. More clearly, the flat at the end helps with a stable takeoff. This is exactly why vert ramps have vert. That’s how physics works. Where a full transition ramp really shines is where an expert rider can easily adjust their launch angle by how they absorb the end of the ramp. If they are coming in too hot and need to mellow the launch a bit, they can collapse a little at the end of the ramp, effectively turning a 45 lip into a 35 degree lip. That can still be done with the flat section at the end of the ramp but the maximum angle would probably be far lower than the full transition ramp.
The folks at Trailism.com have a great write up on the topic of launch angle and projectile motion relating to jump design. It’s work a look into. One of their images below:

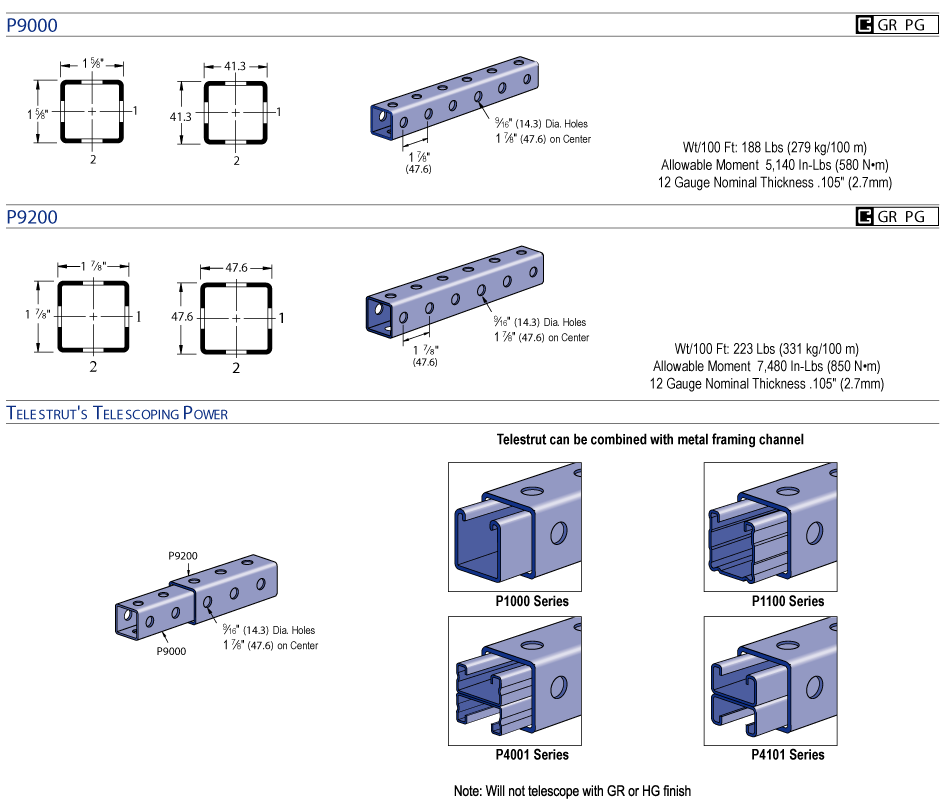
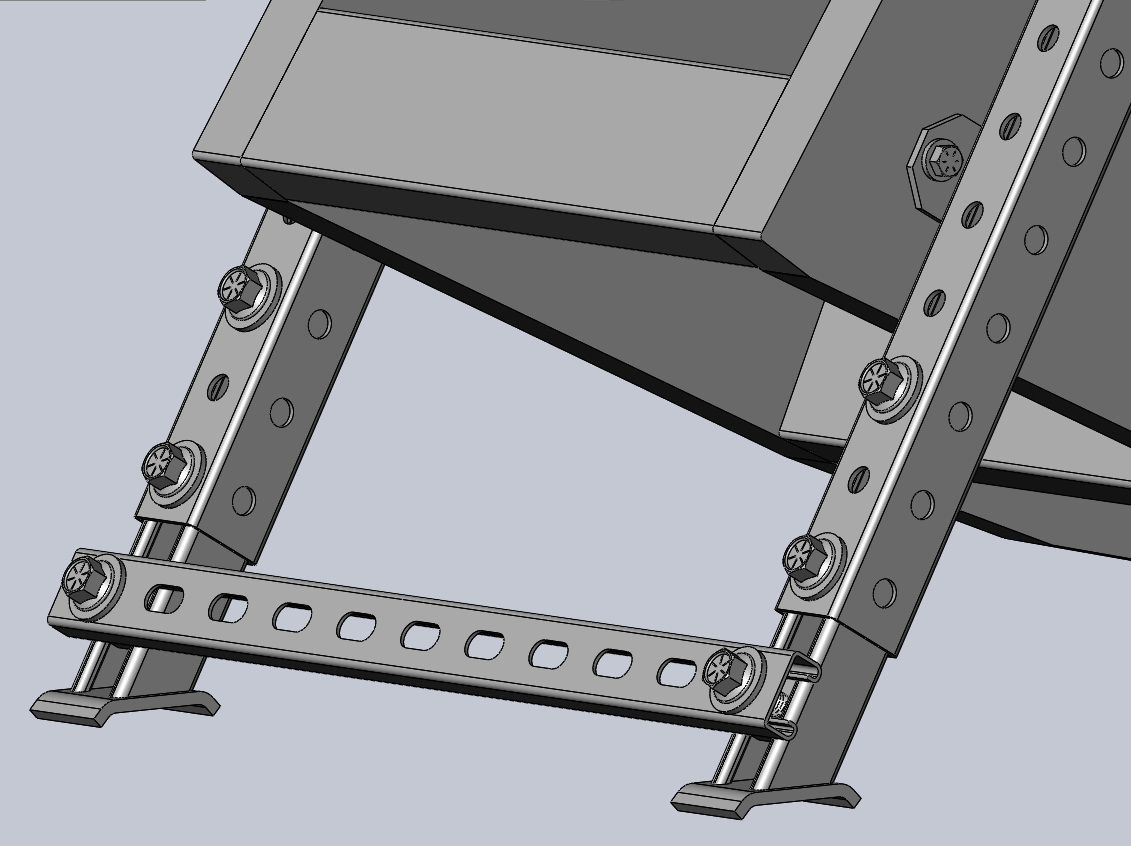
The bike jump is different. I haven’t actually built this type of design but basic principles hold. It uses 1×4 slats for the surface. This gives dirt a place to go. It has no plywood so it’s is more tolerant to water. If more traction is needed, chicken wire can be stapled to the surface. The Unistrut telescoping tubing gives the ramp footing on uneven surfaces. 3/8″ bolts allows the legs to be removed quickly for easy transport while still being super solid.
It would make sense to use pressure treated lumber for the bike ramp. Not a good eco choice if it is left to decay in the woods but good if the ramp is kept and expected to last a long while in the rain.
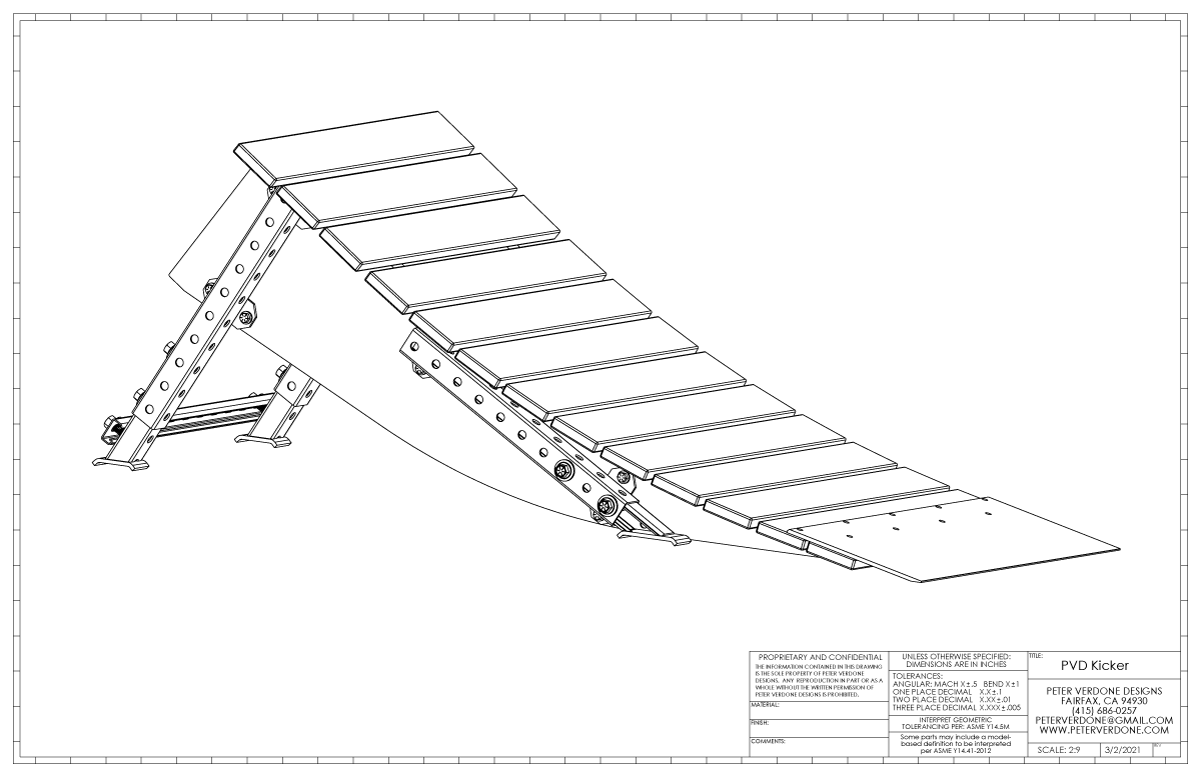
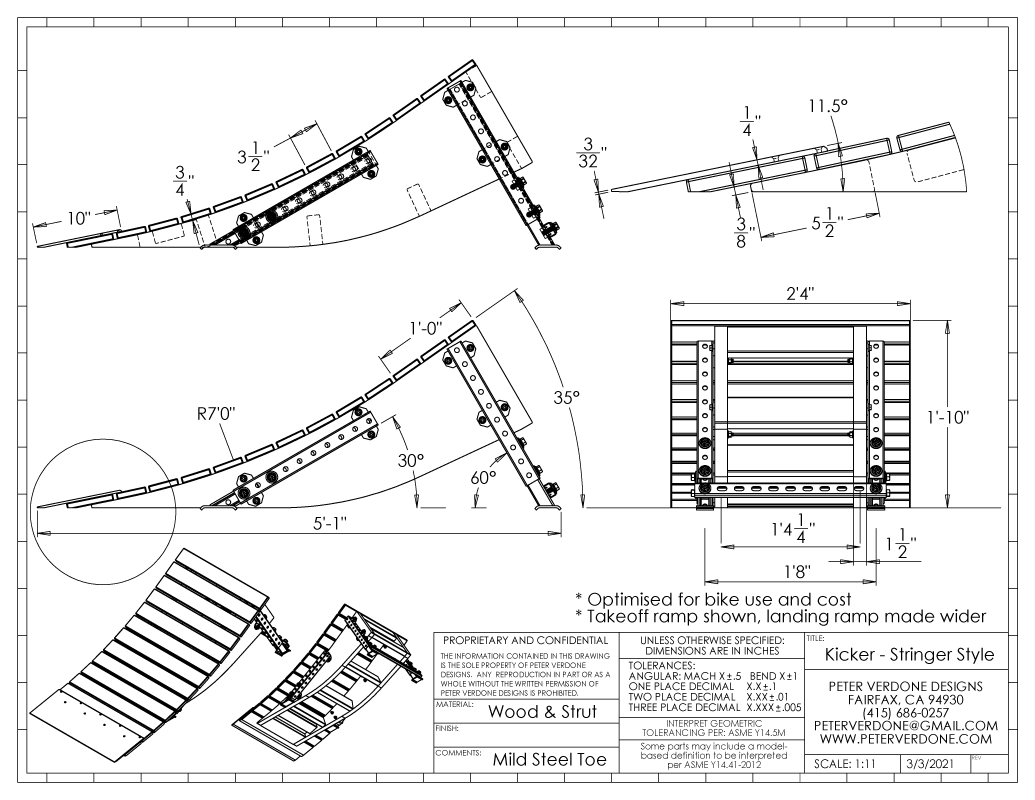
This ramp makes use of UniStrut components to solve some of the more complex issues. I suggest you look them up. UniStrut is preferred to 80/20 when loads go up and service gets more demanding. The Lego principle still applies and the parts can be used over and over. I’m going to look for more UniStrut parts to get in on this ‘adjustable strut’ design to reduce the fabrication needs.
Both of these ramps need some fine tuning to get the proportions just right but this is pretty close for the size that they are.
A great tool that we have in our arsenal when we build ramps or transition of any kind is math, trigonometry specifically, the saggita more specific than that. Using this handy device, we can quickly and easily measure any curve around us. Give it a try.
![]()
Some folks have pointed out that toy ramps are sold in stores and online. They are and they suck. Maybe for folks that don’t have experience with quality ramps this seems cool but I’m not down. Toy ramps fall apart, wobble around and just don’t work optimally. Toy ramps are great for kids that like to play basketball or golf. I have yet to see any ramp for sale that is even close to what can be built at home, for less money, and adjusted to exactly your needs. A good, well-built ramp of just the right size just can’t be bought. A good ramp is pretty heavy and is hard to ship inexpensively. A ramp should be solid as a house. It should kick just right. If you need it different, you should be able to build a new one. This is old school and it’s still true.
Of course, on a bike, something as simple as a small rock can work as a jump. Danny Macaskill shows that following the link below.