SPRINGS
Springs are the most important part of the suspension system, other than the tires. They are what holds the bike up, support it under braking and accelerating, and pushes the wheels into dips in the road. Without proper spring selection, the system will not work correctly, no matter what adjustments are made. Oil height is part of the spring component.
Spring rate determines how the bike responds to varying loads. Prolonged braking, acceleration and cornering g's are examples of changing loads. Under severe braking, the fork springs (assisted by the air spring component created by compressing the volume of air above the oil) have to be able to support the total mass of bike and rider (less front end unsprung mass) while still having some travel available for traction. The rear spring needs to support the whole bike and rider (less rear unsprung mass) during strong acceleration while still having some travel available for traction. During cornering, the two ends need to be sufficiently balanced so that one end doesn't compress dramatically more than the other. Given any change in load, the system seeks a new equilibrium position where it can come to rest. Note: that I am referring to the equilibrium position and not the dynamic motion of the system. Spring tuning is not used to address issues of the motion of the system, but rather how a system comes to rest under different loads.
The correct spring is the softest spring available, that is able to support the bike and rider under the hardest of braking/accelerating while still leaving some room for the system to travel if a bumb is encountered in this state.
Springs are rated in three ways, based on the amount of force or mass it takes to compress the spring a given amount:
- Pounds per inch - or kg/mm * 55.88 or N/mm * 5.71
- Kilograms per mm - or lb/in / 55.88 or N/mm / 9.79
- Newtons per mm - or lb/in / 5.71 or kg/mm * 9.79
Only three ways of determining the correct spring rate exist.
- Mathmatical modeling and calculations - This would be done by the factories or engineers of top teams. It would be good for getting things in the right ballpark, but all of the variables are impossible to consider.
- Data Acquision - This is done by most top level race teams. The actual position of the system will be known for any track position or condition. This is really the best way of knowing what is happening.
- Test Rider - A very knowlagable, very experienced rider, with a high degree of skill, will be able to determine if the springs are correct. This is really the point where theory and style will part ways. The stopwatch is the metric.
Most of us are not able to use any of these tools. Worse yet, as good as one person may be at test riding a bike, they can never be a true substitute for the actuall end rider. Due to this, we fall back on some rules of thumb to get us in the ballpark. By using the delta of rider and free sag we can estimate how close our springs are. These are not hard rules, and are open to exception at any time. Remember, also, that sag is a geometry attribute and has almost nothing to due with the suspension system other than changing the extention/compression available at any given point, or in other words, bump and droop distribution.
We can use the concept of "Free Sag" to use the geometry attribute of sag to predict and tune the suspension attribute of spring rate. By examining how the bike compresses changing the load with and without the rider, we can determine the change in equilibrium positions of the springs. By using some basic conventions, we are able to tune for the appropriate spring rate. Just to use some imaginary numbers, lets say that the rider and gear weighs 200lbs. and the sprung weight of the bike (with gas) is 350lbs. In this case, the bike alone is 60% of the weight that the spring must hold up. Roughly 2/3 of the rider's weight will be applied to the rear wheel, so the change in the Free and Rider Sags will be greater at the rear.
The rate of the spring is critical. If desired Rider Sag is 35mm and desired rider contribution to the sag is 15mm, then that means Free Sag should be 20mm. Any spring will give you 35mm of Rider Sag, given some preload position, but only one spring (rate) will also give 20mm Free Sag with the same preload position. In other words, given specific goal numbers, only one correct spring rate exists.
Terminology varies a lot, so for this case let:
Rider Sag = Measured sag of bike and rider w/ rider and rider's gear.
Free Sag = Measured sag of just the bike, no rider, no rider gear.
Note - It may help to set all the slow speed damping adjusters to full open when setting sag.
SPRING RATE -
Spring Rate OK - Both free and rider sag within acceptable range.
Spring Rate too soft - Rider Sag OK, but too little or no Free Sag
Spring Rate too firm - Rider Sag OK, but too much Free Sag
SAG -
Front -
Rider Sag - 30-35mm (25-30% of Full Travel)
Free Sag - 15-20mm (60-70% of Rider Sag)
Rear -
Rider Sag - 20-30mm (race), 30-35mm (street) (25-30% of Full Travel)
Free Sag - 5-10mm (extremely light bikes use less) (15-25% of Rider Sag)Special Cases
* "Complications in sag setting results in the use of top-out springs, such as Ohlins' use in their modern shocks and several companies are now including in their forks. These typically increase the free sag while having no effect on rider sag."GB
* Air caps on some older forks are either present to allow the gasses in a hot fork to be equalized with outside ambient pressure, or to act in a way similar to having adjustable oil height. Bleed the pressure off while performance tuning.
*"Production based bikes and road bikes need 5-10mm free sag at the rear and 15-20mm at the front. 250GP bikes will have 10-20mm at the front and nothing at the rear. 125's effectively have negative rear free sag, with the bike topping out solidly without the rider, but with 10-15mm at the front."GB
Standard practice is to use a spring at least twice as long as the compression range that the spring will experience. I personally believe in using the longest spring that fits within a given shock.
Traxxion Dynamics has two crude charts that can help select spring rates. Chart 1 is for forks and Chart 2 is for rear shocks.
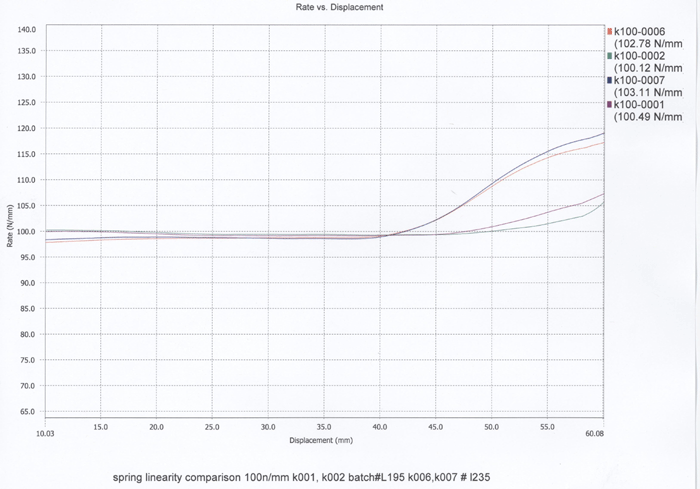
Linear rate springs are actually not linear. All springs are actually progressive. Dan Kyle recently published a cool experiment testing this. The shorter springs became progressive much earlier than the longer sprngs.
Polishing the springs
The outside edge of fork springs should be polished. When fork springs compress they tend to grow in diameter and bow. Under hard compression, they could rub the inside walls of the fork. If the spring is polished, they will not drag much if this happens.
Where do I get the killer springs?
While the quality of any spring you may have around or purchase will certainly exceed all of your needs, Hypercoils Springs, Eibach Springs, H&R Springs, or Vogtland are the way to go for aftermarket racing grade rear springs. They make so many sizes and rates that one is sure to fit your needs. I have personally checked the rate on several Hypercoils springs and have found them to be within 1% of their labled rate. For front springs Ohlins will have drop in replacements and they have a very good reputation. Race Tech also sells fork springs. The labeled rate of the Race Tech springs have been called into question by many sources, although they are still fine quality springs. I rated some 0.85kg/mm labeled springs that I have and they were actually 0.90kg/mm. The Race Tech front springs are slightly longer than stock, but will fit fine after cutting a new spacer. You will probably have to cut a custom spacer (use PVC tube) whatever you do. If your bike has adjustable preload knobs, cut a spacer that will give you the correct sag with the adjuster in the first 1/3 of its range. Renton Coil Springs (RCS) also makes titanium springs for motorcycle applications.
OEM Manufactures can sometimes supply just the right spring for a stock shock. HRC or YEC kits will include parts like these:
Front Rear 01-02 CBR600F4i 51401-NL3-621 (Front, 0.8-1.0) 52401-NL3-651 (Rear, 14.2) 51402-NL3-621 (Front, 0.8-1.1) 52402-NL3-651 (Rear, 14.7) 51403-NL3-621 (Front, 0.85-1.15) 52403-NL3-651 (Rear, 15.2) 03-04 CBR600RR 51401-MEE-003 (Front, Stock) 51407-NL3-750 (Front, 0.85) 52401-NL3-750 (Rear, 10.5) 51408-NL3-750 (Front, 0.90) 52402-NL3-750 (Rear, 11.5) 51409-NL3-750 (Front, 0.95) 52403-NL3-750 (Rear, 10) 51410-NL3-750 (Front, 1.00) 52404-NL3-750 (Rear, 11) 52401-MEE-003 (Rear, 12) 05-06 CBR600RR Not yet researched Not yet researched 04-05 CBR1000RR 51401-MEL-003 (Front, Stock) 51401-NL9-901 (Front, 0.90) Not Sure if HRC Springs will work 51401-MEL-R11 (Front, 0.95) with stock rear shock 51402-NL9-901 (Front, 1.00)
Can't I just modify my stock springs?
Yes, you can, but you shouldn't. Springs are cheap for what and how important they are. It will cost you less than $100 for either front or rear springs. Springs that you buy are rated, tested, and have superb fit and finnish. The time you spend modifying stock springs will be worth more than the cost of replacements and the modified springs will still need to be rated. When thinking about the theory of modifying springs, try to imagine the spring unwound so that is a long rod. As we all know, the longer the rod at a given diameter, the easier it is to bend. If you were to cut this rod to be shorter, it would get stiffer. That is basically how modifying springs works. You cut material off to make it stiffer. Formulas for how much to cut exist and can be found relatively easily. Once the material is removed, the end is then bent in and finished to give it a flat mate. My advice on all this is to not do it. If you get poor results, you cannot go back to where you were before, but if you buy a new spring you can go back at any time.
What about progressively wound springs?
Some companies manufacture springs that are wound progressively or have dual/triple rates. Progressive Suspension, HyperPro and WP Suspension are most noted for these. These springs are marketed to novice riders as a one size fits all solution to spring tuning. This is an extremely foolish way of looking at springing a bike and should not be encouraged. That said, progressive or dual rate springs do have a place in suspension tuning. These springs should not be used until every other suspension tuning avenue has been explored without success. Quality sportbike suspension has more than enough tuning options to account for almost any terrain or track. Going to these springs should be the last option for suspension tuning, not the first. Certainly in the rear of the bike, to adjust for progressive, linear, or regressive rates the linkages rather than the spring should be modified. Progressive springs are very difficult for even professional tuners to get right without the ability to have custom 'one offs' made for each track and rider. Miguel Duhamel's HRC WSB superbikes are rumored to use progressively wound fork springs.
Stock machines may come with progressively wound springs. This is not done for performance by any means. This is done for the previously mentioned reason, that the factory is trying to make a bike that will perform reasonably well for almost all riders.
What about aftermarket forks and rear shocks?
Spring Math:Most current sportbikes have very high quality suspension, both front and rear, that until recently was only dreamed about by the average rider or racer. Cartridge forks and remote reservoir rear shocks gained widespread use in the mid-ninties. A cartridge fork is essential for the performance minded rider. The presence of external damping or preload adjusters is not very important since proper tuning will archive the desired results. Some top racers feel the need to upgrade their forks to one of the several types of Ohlins Forks, or swap the entire fork cartridge assembly with a K-tech or GP Suspension cartridge unit. While these are beautiful examples of the state of the art, they are far outside the performance needs of most riders or even most racers. Ebay has become THE place to find OEM fork upgrades from other bike models. For riders stuck with the older damper rod forks, Race Tech makes a Cartridge Emulator that can significantly improve the performance of the stock fork.
Two major players are in the rear shock market, Ohlins and Penske Racing Shocks . Other manufactures do exist in this market, but these two are unquestionably at the top. Ohlins has been producing very high quality suspension products for a long time. Penske is fairly new to the motorcycle market, but brings years of knowledge from their domination in almost every other form of auto racing. Many valid reasons exist to replace a stock rear shock: the need to service an unserviceable stock unit, to change springs when none are available for the stock unit , to gain advanced damping adjustment features. One of the most desirable traits of the aftermarket rear shock is the ability to adjust to different 'eye to eye' lengths. Some stock bikes may have this feature, or what is known as "Ride Height Adjustment", but most do not. This gives the tuner the ability to change the bikes geometry from the rear of the bike, affecting not only steering angle and trail, but more importantly squat behavior.
I highly recommend the Penske Racing Shocks. They provide for a level of tuning unavailable on the Ohlins unit (16 different piston types), they are often cheaper, they can be ordered with the proper spring, they are located in USA and the tech guys speak english, and they do not come in a tacky gold color.
To rate an unknown spring:
(11,500,000 x (wire diameter) ^(4)) / (8 x (ID + wire diameter) ^(3) x active coils)
Example: wire diameter = .489; ID = 2.275; active coils = 5.666
Your rate is = 687.0 (I checked this against a Hypercoil spring that I rated on my digital spring scale at 686 lbs/in, and on another spring using new variables that I rated at 805 lb/in, so it works)
Note: The paint on rear shock springs is very thick, you must get a very accurate measure of wire diameter for this formula to work. You may have to remove some paint with a razor blade to get the calipers onto bare metal. I found that the blue Hypercoils paint added 0.011" to 0.012" to the actual wire diameter.
Also: This formula assumes that the spring matirial is a high quality silicon spring. Lower grade springs may give erroneous results. The formula only works for non-tapered, non-progressive springs.
To figure out active coils:
Hold the spring upright and start from the bottom. When the flat end coil comes in contact with the first coil, that’s zero. Up from there, count the number of turns until it touches the other flat end coil. In most cases, it won't end up on an even number. Divide the full turn into 10 units. (Active coils = 8.5; or 9.2; or 7.8, etc.). I found that using a degree wheel or protractor gave me the most accurate divisions.
To figure out the combined rate using multiple springs:
The formula for two springs is: 1/K + 1/K2 = 1/K3
For three springs: 1/K + 1/K2 + 1/K3 = 1/K4
(K=spring rate)
Example: You have an #80 tender and a #370 spring combination.
1 divided by 80 + 1 divided by 370 = 1 divided by K3
#65.8 = K3
or
Combined Spring Rate =
(Spring Rate 'A' x Spring rate 'B')
÷ (Spring Rate 'A'+Spring Rate 'B')
Example: if the rate for spring 'A' is 200 and the rate for spring 'B' is 500, then:
Combined Spring Rate = (200*500) ÷ (200+500) = 143
If you need to cut a spring to obtain a desired rate use this formula:
(K1 x Ac = K2 x AC) (K = spring rate)
Example: a 60 lb. spring with 8.5 active coils =78.5 lbs. x 6.5 active coils
Or
60 x 8.5 = 78.5 x 6
This site has not been
updated since Fall 2006.
Since then, all new projects
have been place on my wiki
site.
If you like what you see on
this site, Make sure to go
to the wiki for even better
projects.