
This is something that I’d been doing in my head for years. I was always guessing. An educate guess, but still a guess. Now, I have it solved.
Designing dirt going bicycles is difficult. There are many crucial details that need to be figured out and understood to produce a design. If a few hundred parameters together in just the right way, you will have a great bike. Screw just one up and it will be garbage.
A long time ago, I made up a personal myth of what defined a good designer of bikes. In addition to many things, they knew the region. They knew the trails, the races, the dirt itself. They would know the shape of the rock and what that meant. Cranks axis height is, more than most parameters, what is influenced by this understanding.
One of the more important parameters that forms the foundation for much of the bike’s shape is the crank axis height. A usable bike will have a crank axis that is not too low. A great bike will have that crank axis as low as it can possibly be….without causing problematic disruptions. High art is to take it right up to the line without going below.
This is complex, even with hardtails. One bike may be fully rigid. Another have a 160mm or 180mm fork. What should the crank height be? How do we adjust for this?
Years of riding experience (riding sick trail), testing, and development has given me insight as to what to aim for. I’ve made dozens of bikes to use on the trails of Marin. I’ve drawn thousands more than that in CAD. Some were better than others but these days I have a good idea of what to target.
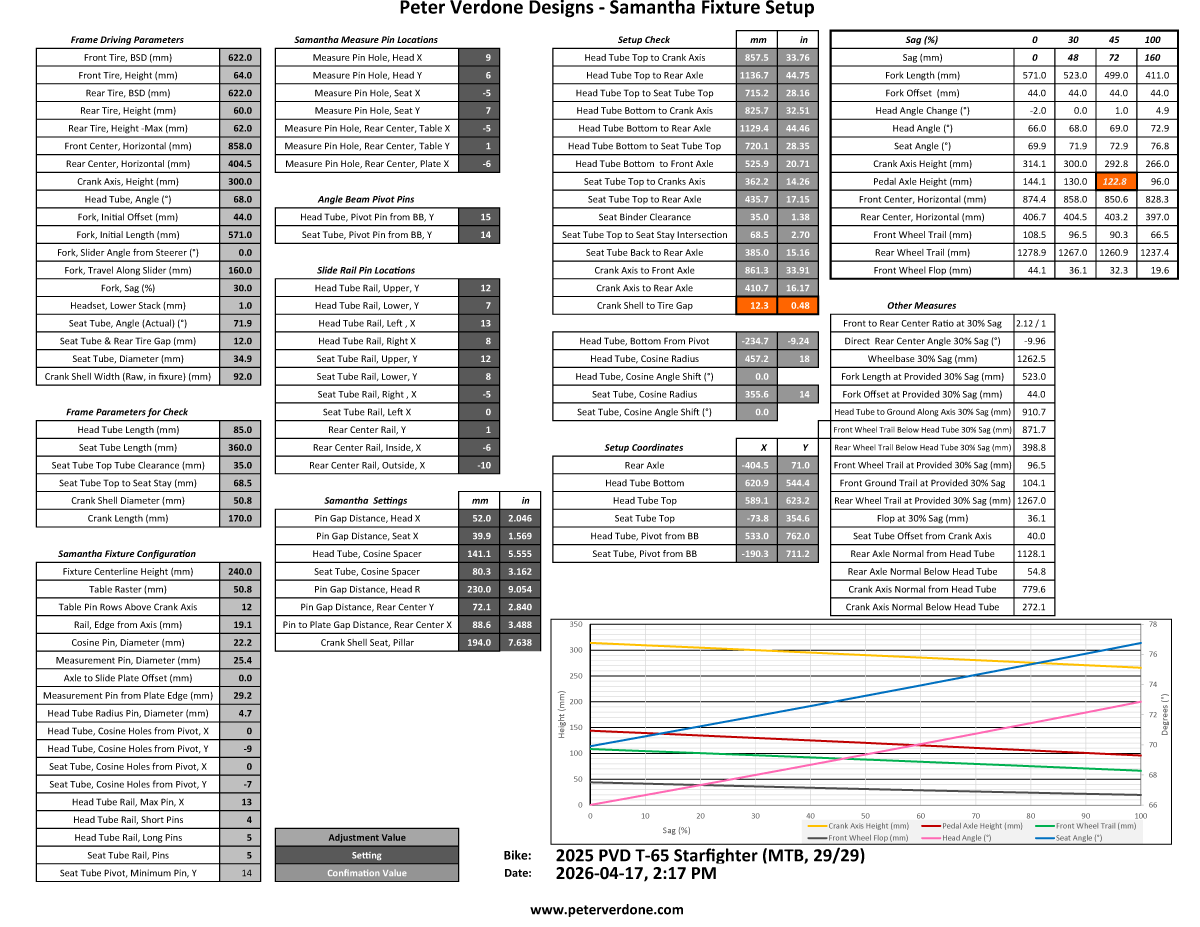
Last week I was doing some work on my calculator for my Samantha frame fixture using a new bike design as an example (the A-10 Warthog). I had been putting off some calculations to add to this for a few years; Change in geometry due to suspension travel. I had something built a years ago but I had found an error. Worse, before I had gotten to fix that, I changed the way I refer to front and rear centers and the need for fork slider angle from the steerer arose. The problem was now far more complex. Simple in CAD, hard with math.
This weekend, we had one of our last rains of the season and it was a doozy. Very hard rain and all day. I decided that I would sit down and deal with this problem that I’d been avoiding. It took 1/2 the day to figure out a strategy and another 1/2 day to implement the math. These values are not estimates, they are exact values. This is difficult math.
Looking at the frame driving parameters, you can see that I’m designing at 30% sag. Others might use down to 20%. Arguments exist for both. I now have an area to the right that describes the bike in several states.
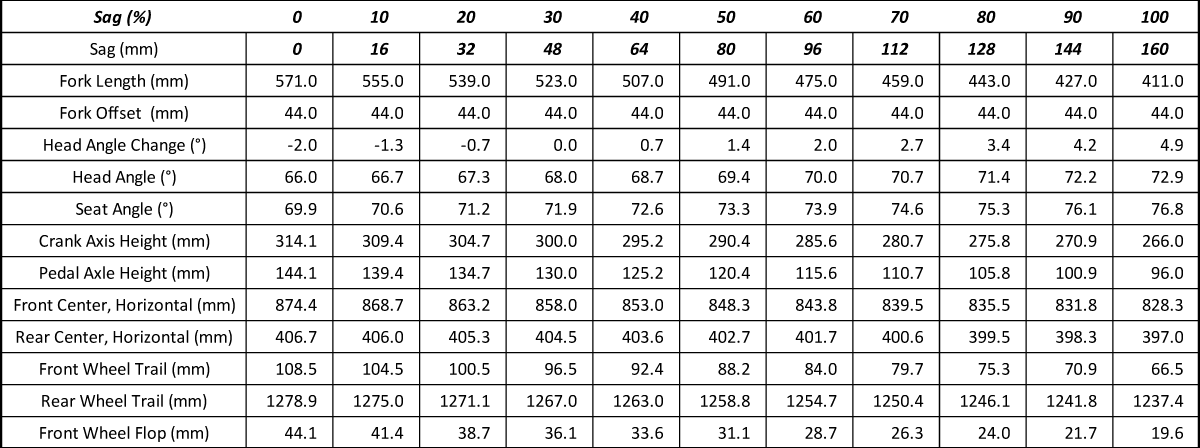
These geometry changes can be seen more granularly throughout the travel range in a separate chart.
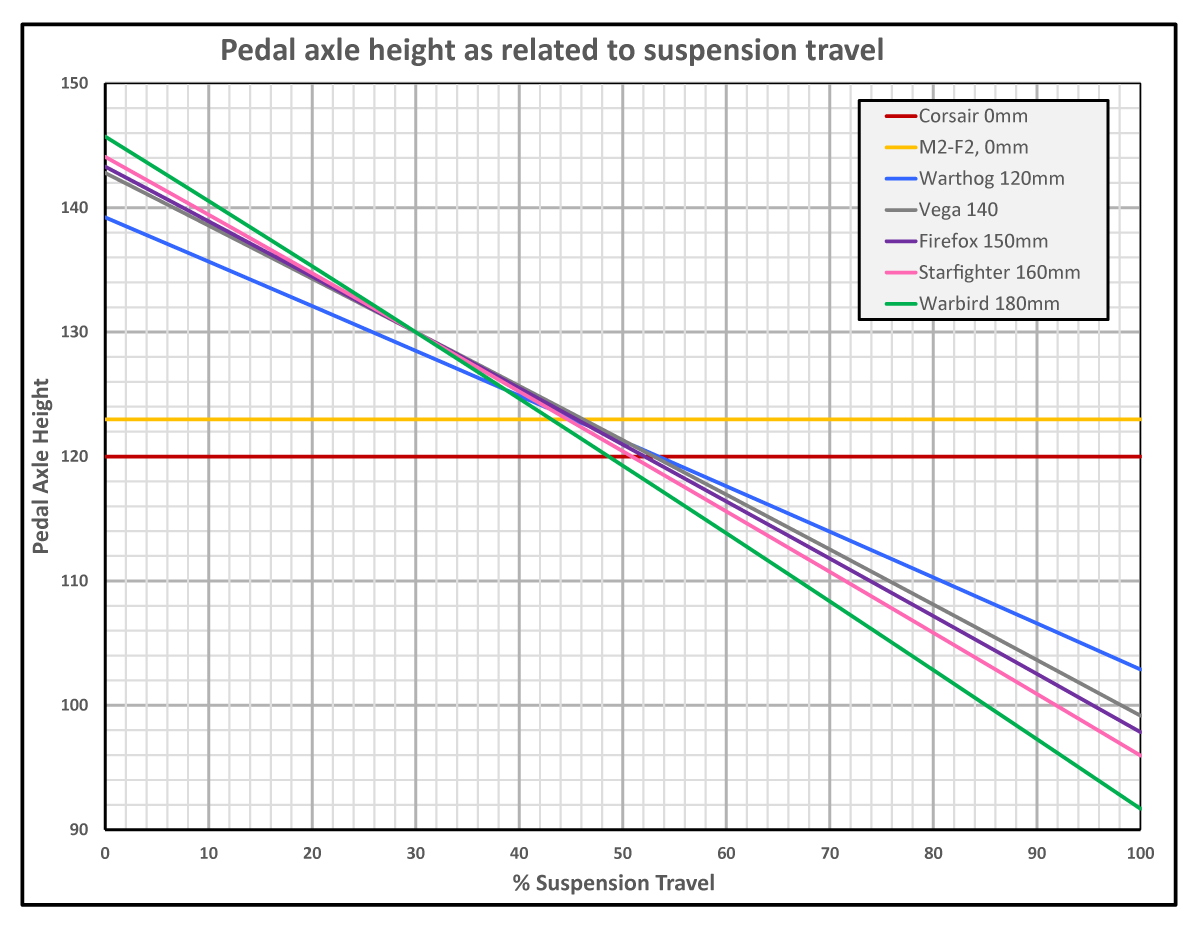
Now I have something that wasn’t easily available until now, a way to look at different bikes as they go through travel. Mapping the pedal axis height of several bikes with differing overall geometry, fork travel, and crank length makes obvious something that I hadn’t known specifically until now.
The bikes sampled ended up with approximately 120mm of crank axis height at 50% suspension travel, 122.5mm at 45% travel, or 125mm at 40%. It would make sense to side with 125mm @40% for hardtail and rigid mountain bikes. The Corsair is an intentionally a low all-road bike (as was the M2-F2). Also remember that these are bikes that span years with huge developments happening in many ways around the whole bike.
Now, a target crank axis height can be specified to account for a variety of geometries and front end systems. Guessing is removed that will, hopefully, keep the bike as low as possible regardless of setup.
Obviously, this is for mountain biking on advanced trail in Marin by a rider of a particular style, size, and suspension setup preference. This may be different in another region for another rider but with valid testing techniques, the same method will show a target.
One should not have to go to the lengths that I did to set a specified height. In BikeCAD, lowering a fork to 45% sag on a locked frame will tell you the height of the crank axis in that state. If you know your target, you can make adjustments to fine tune your design.